This is a story of yet another DIY project. The result is a simple, inexpensive, open-source water-based bed cooling system that uses frozen ice packs instead of active refrigeration. This article explains how it works, why I designed it this way, and where the project stands today.
Introduction
A comfortable night’s sleep is essential for staying healthy, productive, and energized. During the hotter months, many people struggle to fall asleep, or stay asleep, because of the heat. Unfortunately, climate change is making heat waves more frequent and more intense. While air conditioning is becoming increasingly common, not everyone has it, and many people don’t want to leave it running all night.

Commercial bed cooling and heating systems are available on the market. You’ve probably seen them advertised online by influencers. Most consist of a water-filled mattress pad connected to a control unit that heats or cools the circulating water.
These systems look promising, but they also have some drawbacks. They are expensive, and many require an ongoing subscription in addition to the initial purchase. I’m also not a fan of hardware that depends on a cloud service to function. To make matters worse, most of these products weren’t even available where I live.
So… it was time for another DIY project.
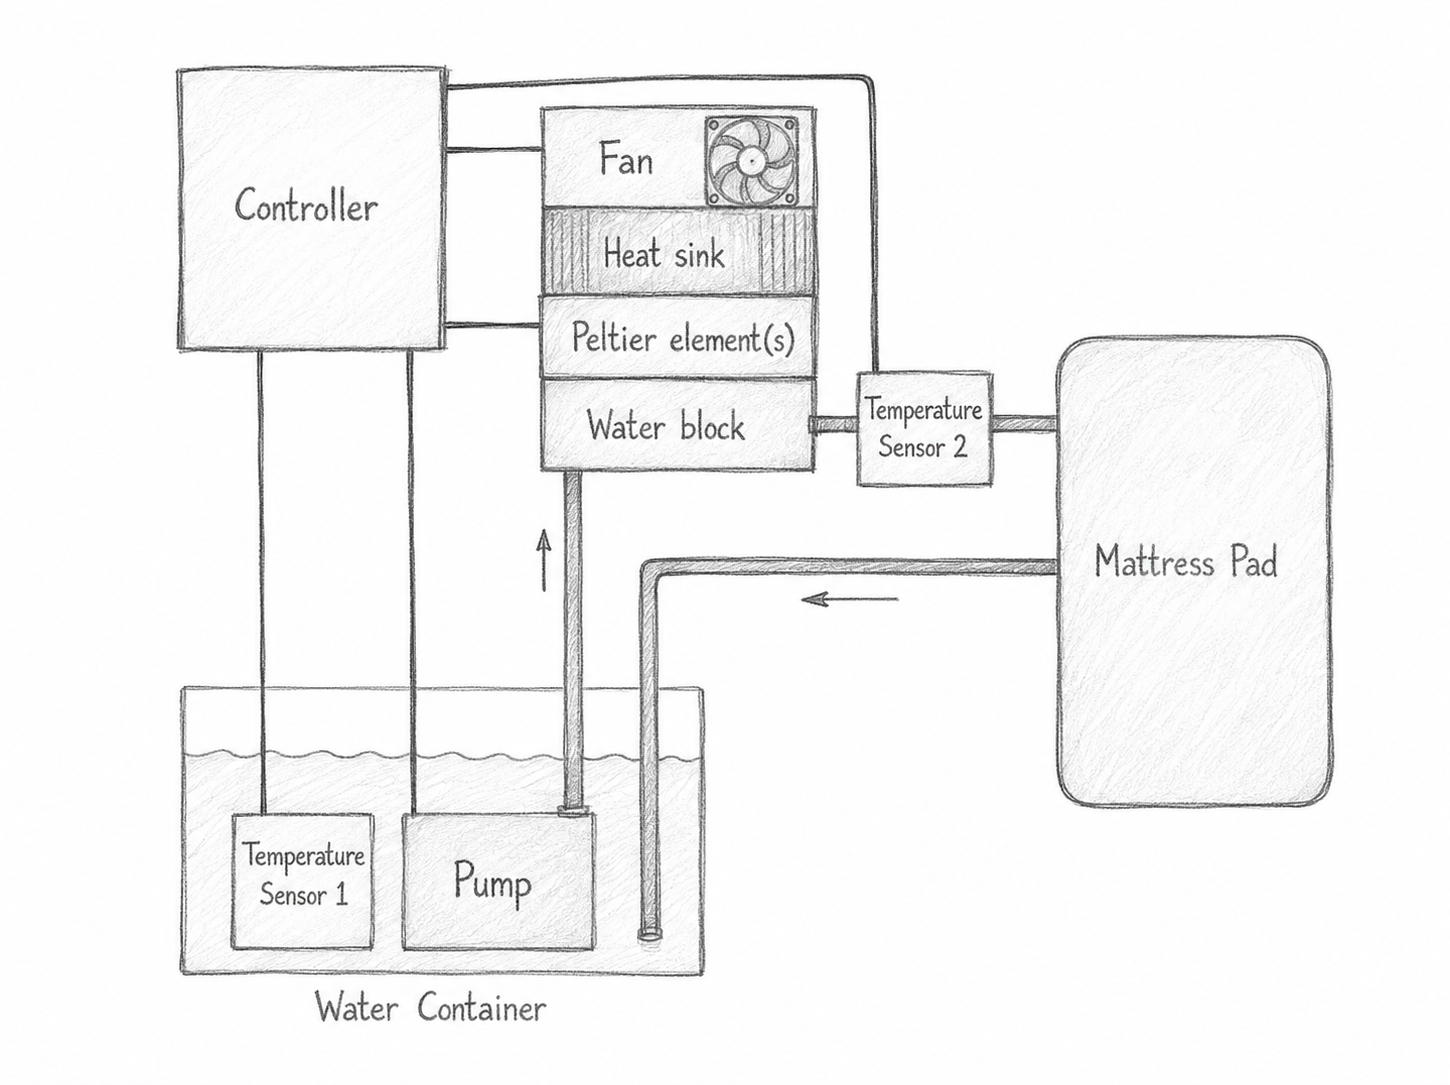
Most water-based bed cooling systems use Peltier elements to heat or cool the circulating water. A Peltier element – also known as a thermoelectric cooler (TEC) or thermoelectric module – is a solid-state semiconductor device that transfers heat from one side to the other when an electric current passes through it.
In a typical cooling system, one side of the TEC is attached to a water block through which the water flows, while the other side is connected to a heatsink cooled by a fan. By reversing the direction of the current, the TEC can either remove heat from the water or add heat to it. The amount of heating or cooling can also be adjusted by changing the current flowing through the TEC.
While researching the topic, I came across a YouTube video by Adam Davenport, who compared several commercial and DIY bed cooling systems.
In the video, Adam used a large drum of water as a thermal mass to measure how effectively each system could remove heat. It’s a great comparison that demonstrates the strengths and weaknesses of the different approaches.
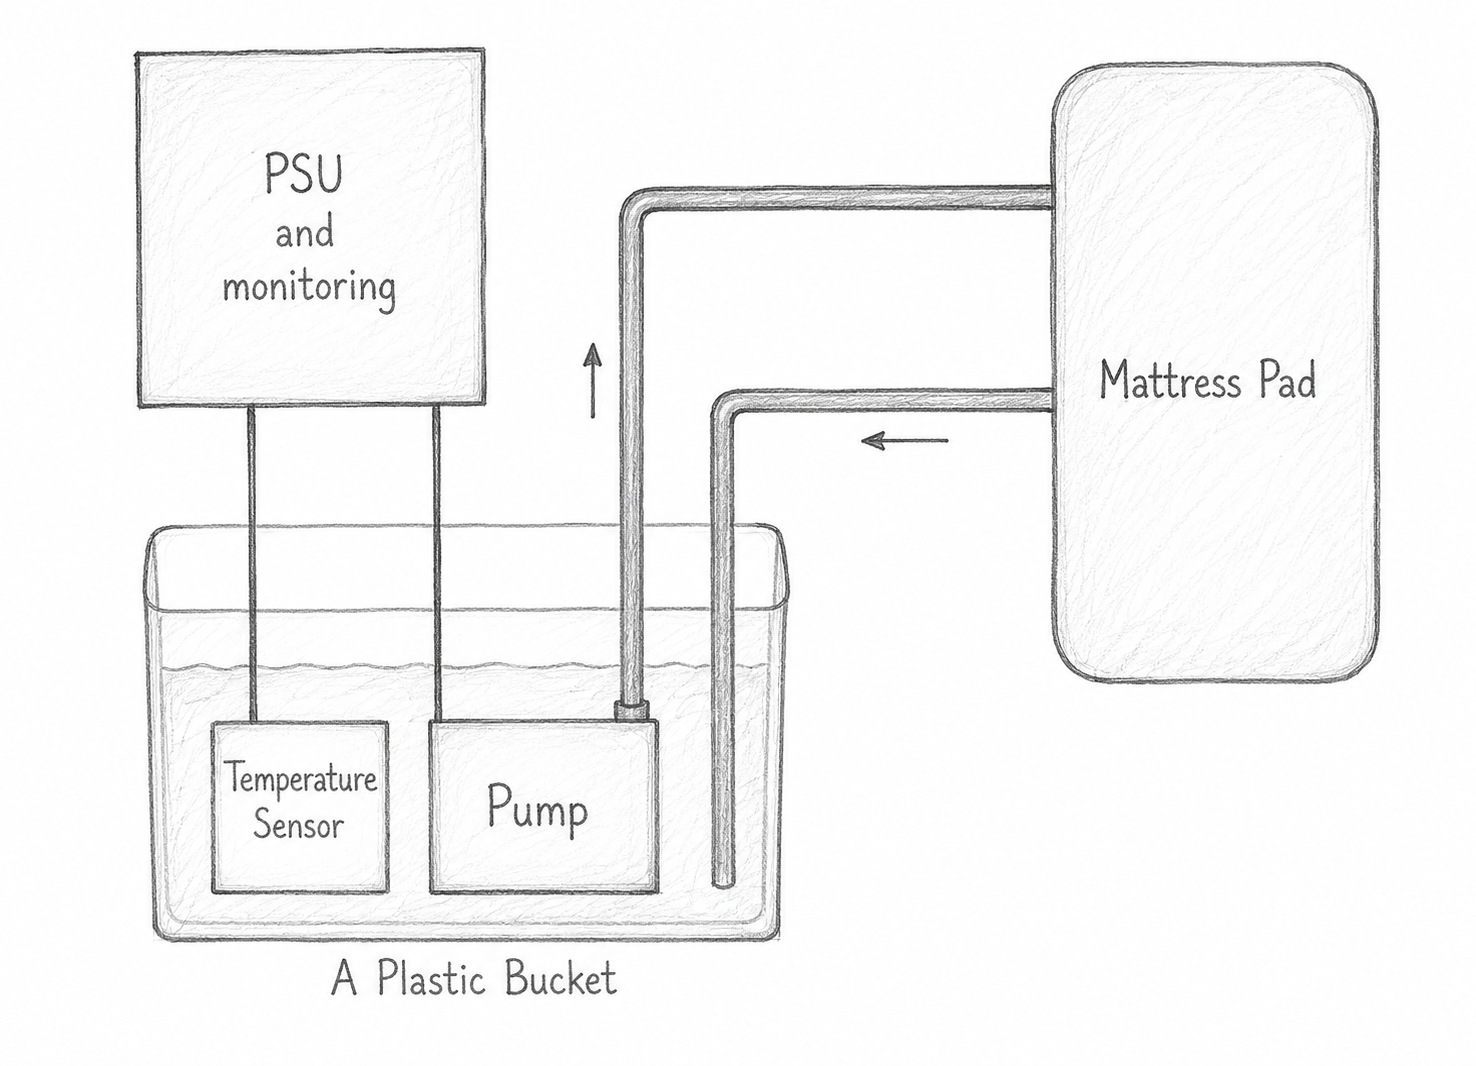
One of the DIY solutions he presented was something he called “A Plastic Bucket”.
The idea couldn’t be much simpler. Fill a bucket with water at room temperature and continuously circulate that water through a PVC mattress pad placed on the bed. There is no active cooling, just a pump moving water between the bucket and the mattress pad.
Surprisingly, this simple setup worked quite well. As heat flows from the body into the water, the bucket acts as a thermal reservoir, gradually absorbing that heat. Over time, the water temperature stabilizes somewhere between the ambient air temperature and the body’s temperature. It obviously can’t cool below room temperature, but even circulating room-temperature water can make a noticeable difference in sleeping comfort.
I’ve always liked simple solutions, and this one immediately caught my attention. It was inexpensive and easy to build. That was all the motivation I needed to start building my own DIY mattress cooling system.
Disclaimer: This project isn’t trying to compete feature-for-feature with commercial products. Instead, it’s an experiment in building a quiet, inexpensive, repairable, and completely open-source bed cooling system using readily available parts. If you enjoy making things, this project is for you.
First steps
I decided to start with Adam’s “Plastic Bucket” approach, but with one important modification: instead of room-temperature water, I would use cold water. The water would be cooled using reusable ice packs that had been frozen ahead of time.
This has an obvious advantage. Rather than adding a dedicated refrigeration system, we can take advantage of something that almost every home already has – a freezer.
I also wanted to add one feature found in commercial bed cooling systems: temperature control.
My first idea was to regulate the temperature by changing the speed of the water pump. The prototype consisted of a bucket, a pump, a flow sensor, a power supply, a custom controller PCB, temperature sensors, and a PVC mattress pad.
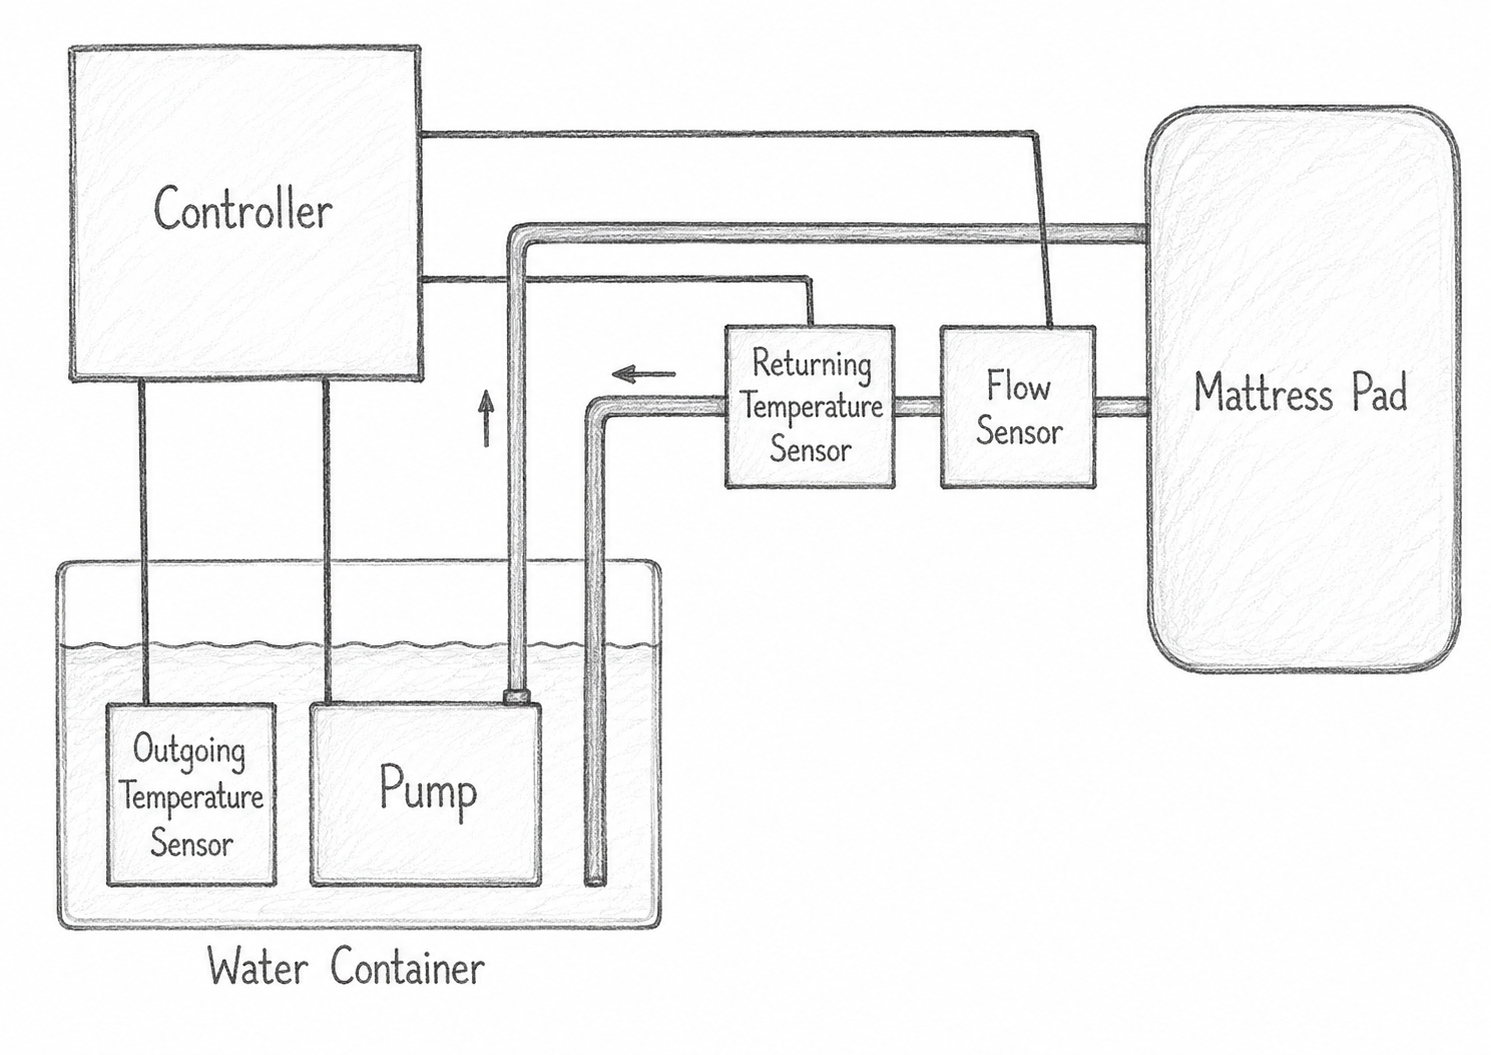
One advantage of this design is that it provides a flexible platform for experimenting with different control strategies as well as with the simple “Bucket” method.
Unlike commercial systems, this design does not actively control the temperature of the water in the bucket. Instead, my idea was to control the temperature of the water returning from the mattress by adjusting the pump flow.
The control algorithm was straightforward:
- If the returning water was warmer than the target temperature, increase the pump speed.
- If it was cooler than the target temperature, reduce the pump speed.
On paper, this seemed reasonable. In practice, it performed poorly for several reasons.
First, water that is too cold is uncomfortable, even when flowing slowly. Reducing the flow rate doesn’t make the water warmer, it simply means that each portion of water stays in the mattress longer, resulting in a larger temperature transfer per volume rather than a stable, comfortable temperature.
Second, most small brushless pumps are not designed to operate over a wide PWM speed range. The relationship between PWM duty cycle and flow rate is highly nonlinear, and many pumps stalled well before reaching low speeds. This left only a narrow usable operating range. A few pumps behaved better, but they were the exception rather than the rule. In my experience, these pumps work best when operated at their rated voltage, or at least with variable voltage control instead of PWM.
Finally, variable-flow control adds hardware complexity. It requires a flow sensor, additional plumbing, and a motor driver. One of my design goals was to keep the system as simple as possible, so this was moving in the wrong direction.
An alternative would be to run the pump in an on/off cycle instead of varying its speed. While this avoids the PWM issues, it introduces a different set of problems. The mattress temperature oscillates as cold water periodically enters and stops flowing, and the frequent pump starts and stops create additional noise that is likely to disturb sleep.
Running the pump continuously without any form of control isn’t a good solution either. The water is initially too cold for comfort, and once the ice packs melt, the cooling effect disappears relatively quickly.
The conclusion was clear: although the Bucket method is surprisingly effective, and adding cold water certainly improves it, neither approach provides the consistent comfort needed for a good night’s sleep.
From these experiments, I arrived at an important insight. What really matters is not simply making the water as cold as possible, but delivering water to the mattress at a stable, comfortable temperature. The human body has a relatively narrow temperature range that feels pleasant. Too warm is uncomfortable – but so is too cold.
Two buckets, Two Loops
The experiments led to an interesting realization.
We actually have two different requirements that seem to conflict with each other. On one hand, we want a large reservoir of very cold water to provide plenty of cooling capacity. On the other hand, we don’t want to pump near-freezing water through the mattress. What we really want is to circulate water at a stable, comfortable temperature.
The solution is to separate these two tasks.
Instead of a single container, the system uses two water reservoirs and two independent circulation loops.
The main loop continuously circulates water through the mattress pad. This water is maintained at the desired temperature – the temperature you actually want against your body.
The cooling loop contains much colder water, cooled using frozen ice packs. Its only purpose is to remove heat from the main loop when needed. The two loops never mix. Instead, heat is transferred between them through a simple copper tube heat exchanger.
I call this the “Two Buckets, Two Loops” design.
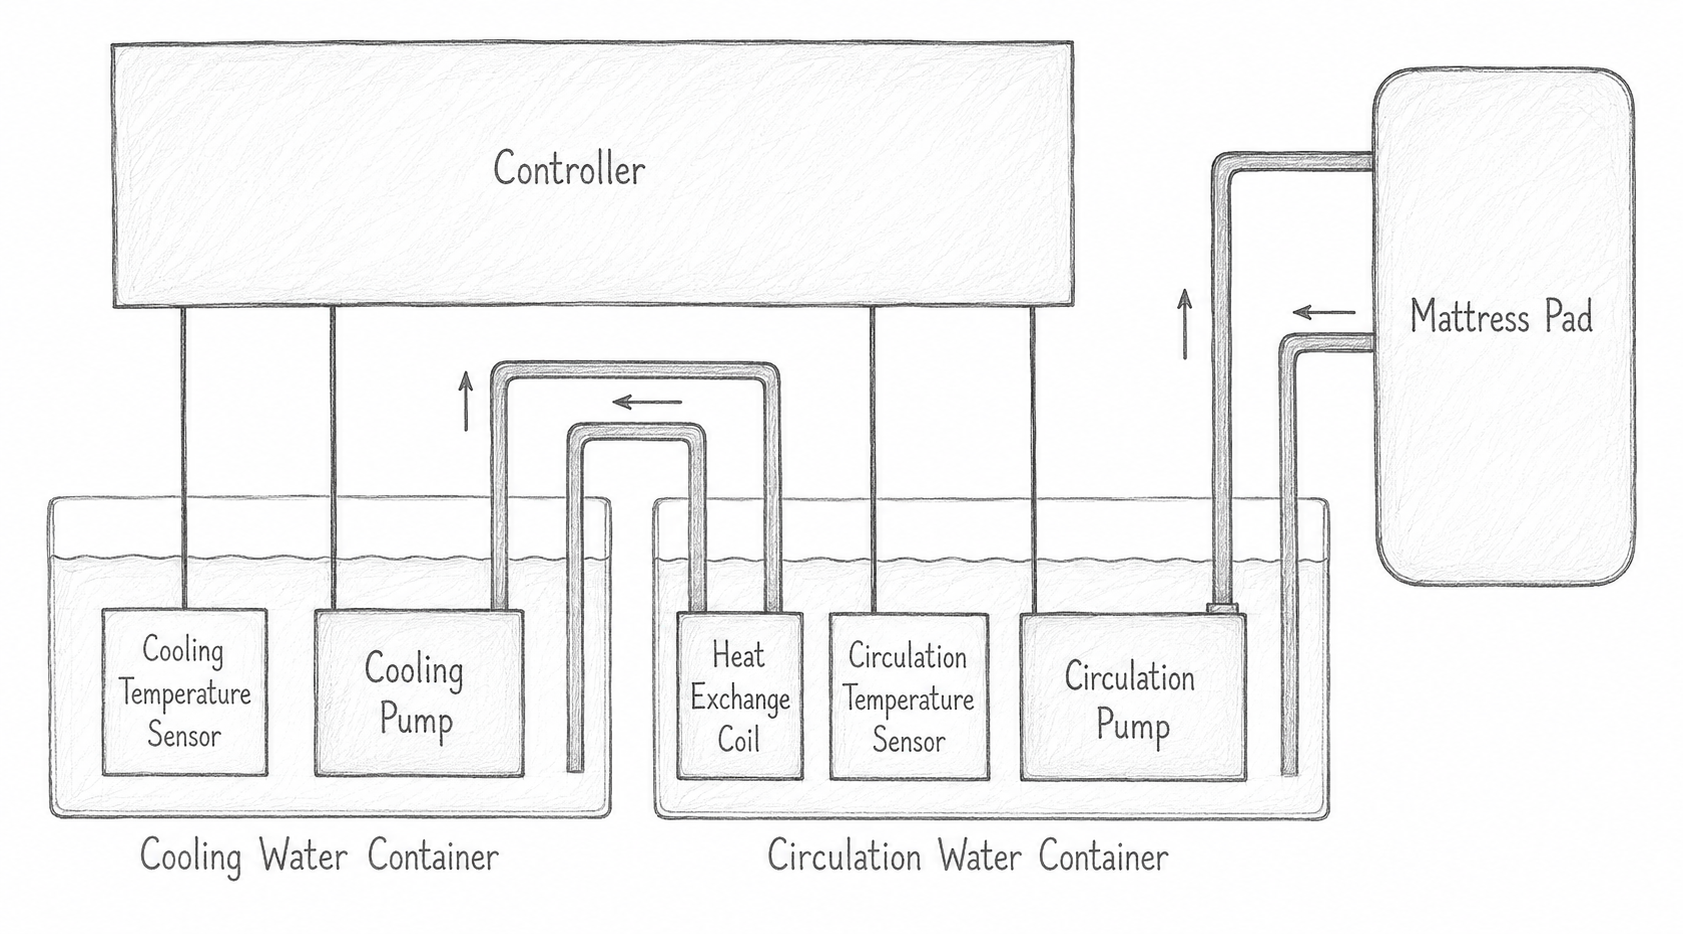
Although I call them “buckets,” actual buckets are only useful for experimentation. For a practical system, insulated plastic containers – or even better, portable iceboxes – are a much better choice.
They offer several advantages:
- Opaque, preventing light from encouraging algae growth.
- Closed, reducing dust and other contaminants that can promote bacterial growth.
- Insulated, allowing the water to stay at the desired temperature for much longer.
- Made for water, so they won’t rust or corrode.
An unexpected bonus of this architecture is that it can also be used for heating. Instead of cooling the main loop with ice water, a heater can be placed in the main reservoir to maintain a comfortable warm-water temperature during cold weather.
Unlike commercial systems that continuously generate cooling using thermoelectric modules, this design stores cooling energy in frozen ice packs. The freezer does the hard work ahead of time, allowing the bedside unit itself to remain simple, quiet, inexpensive, and energy-efficient.
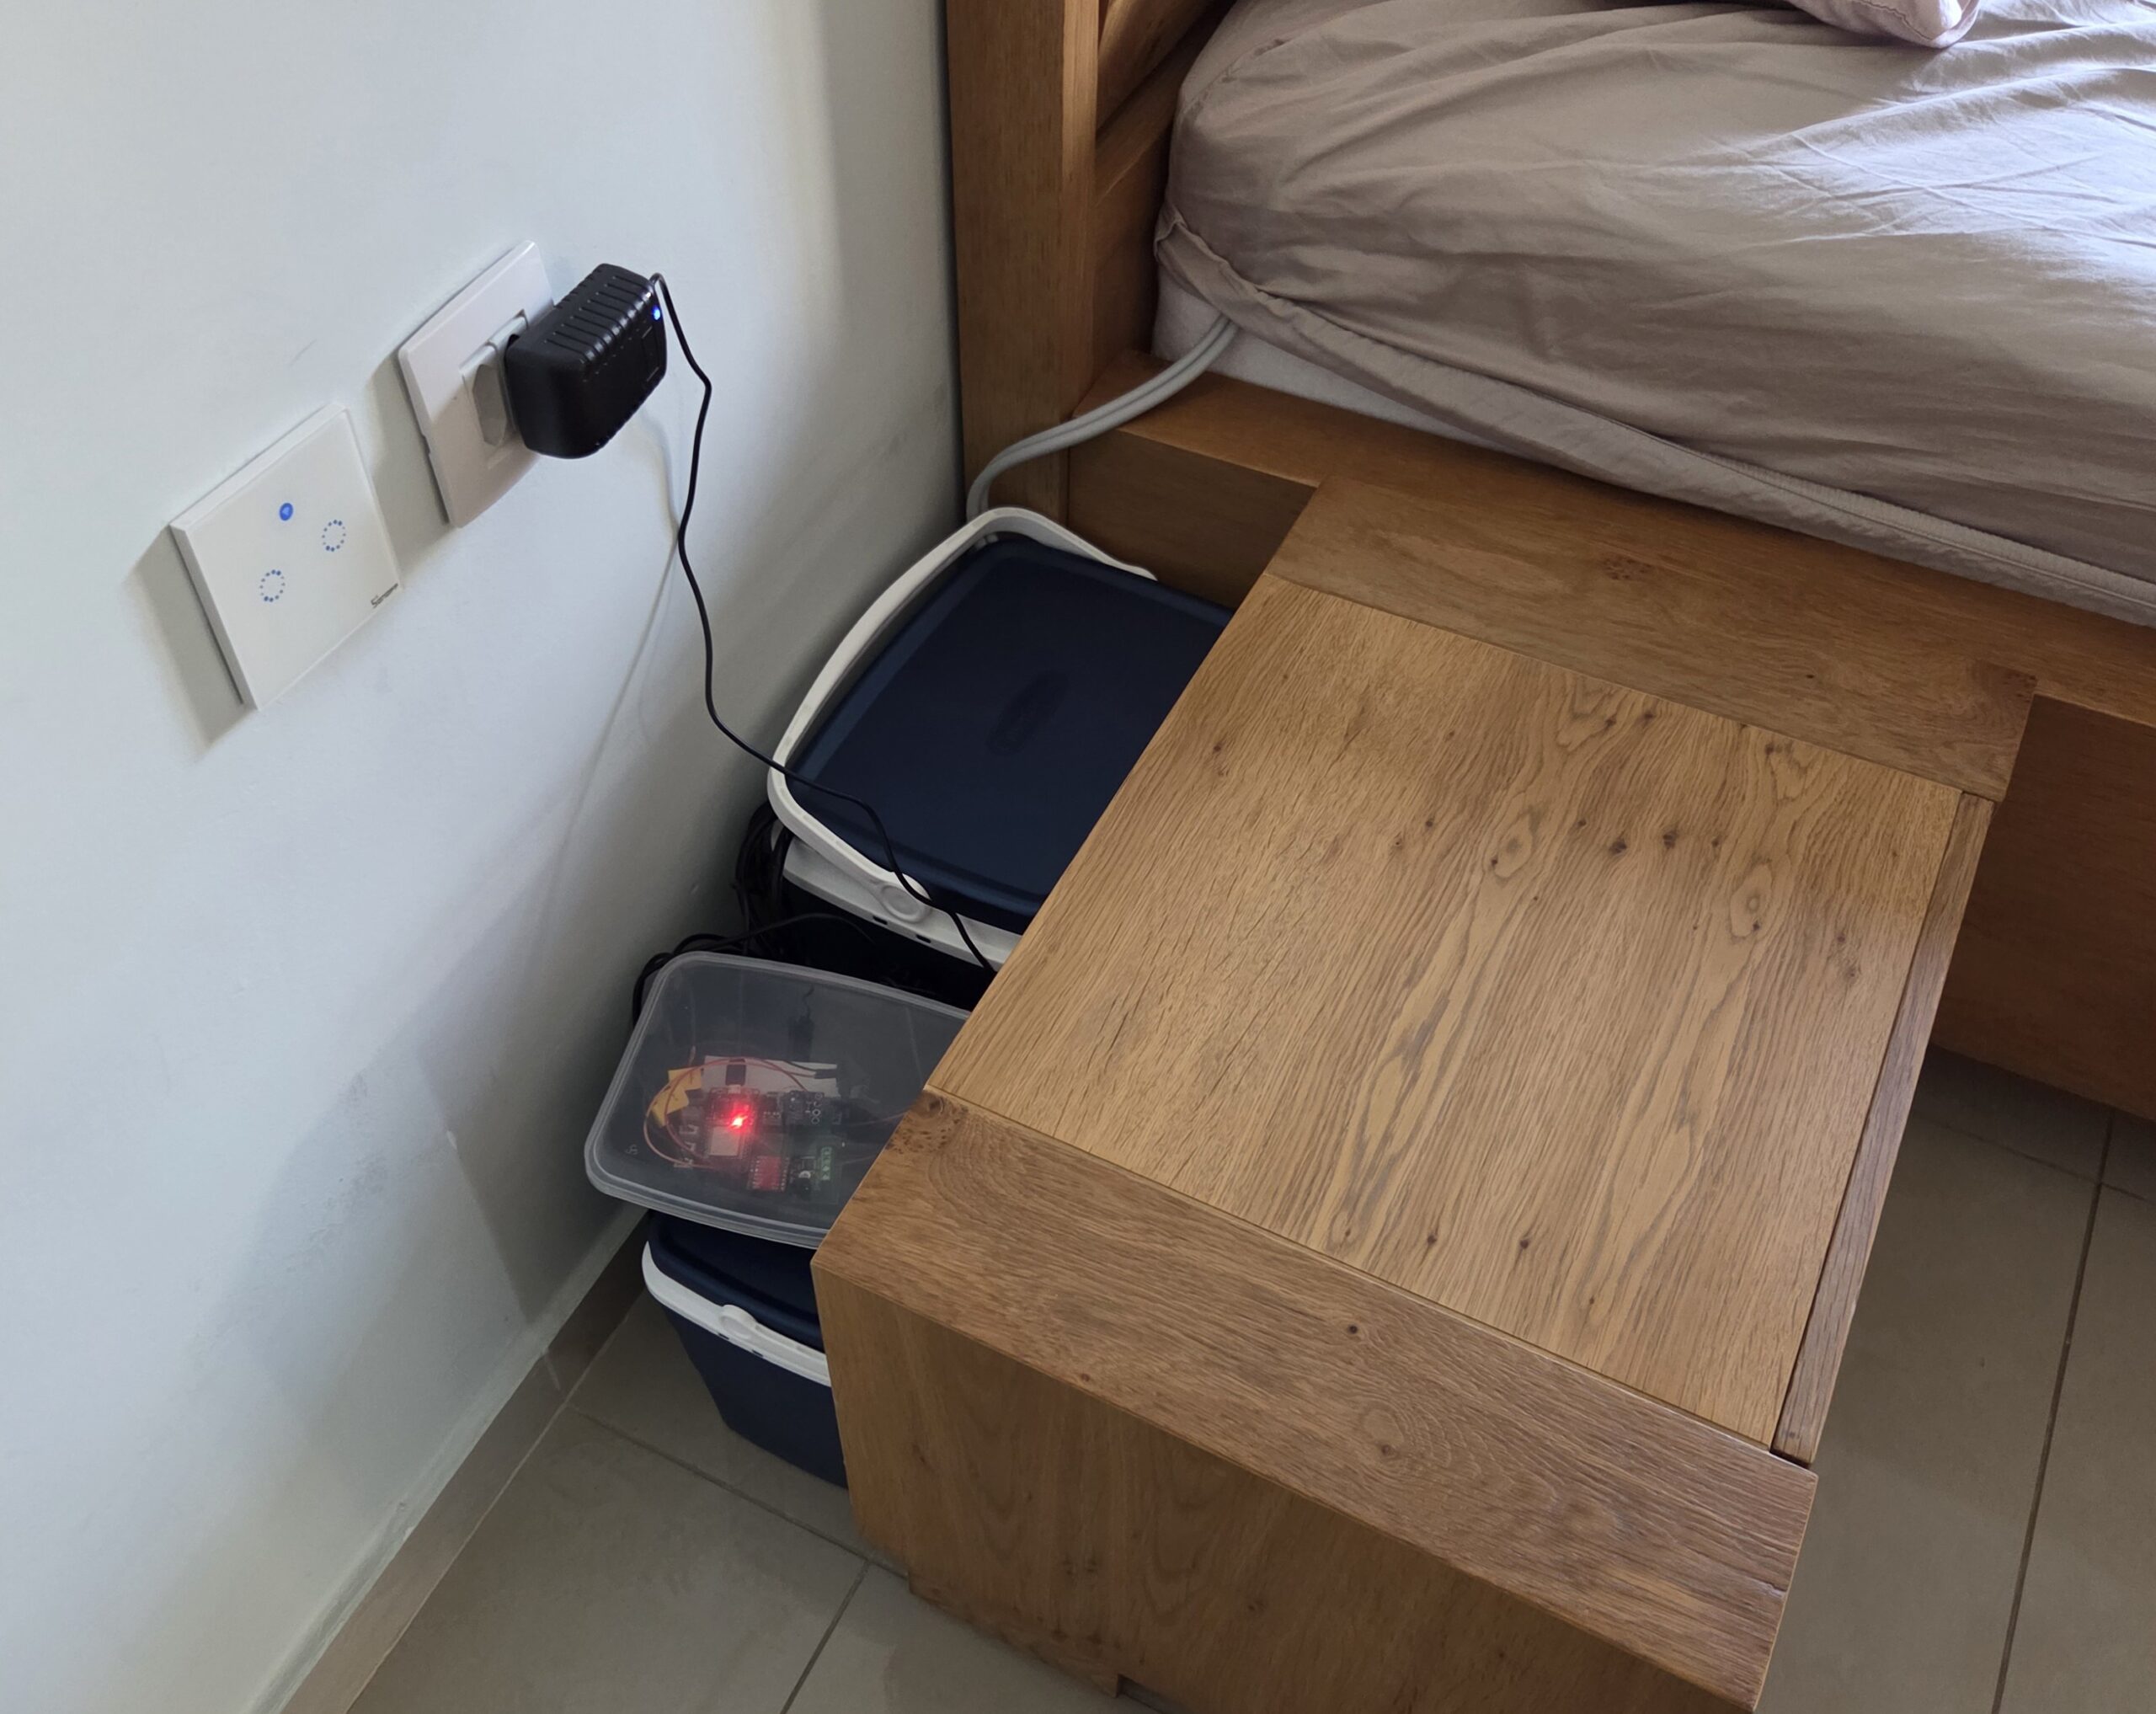
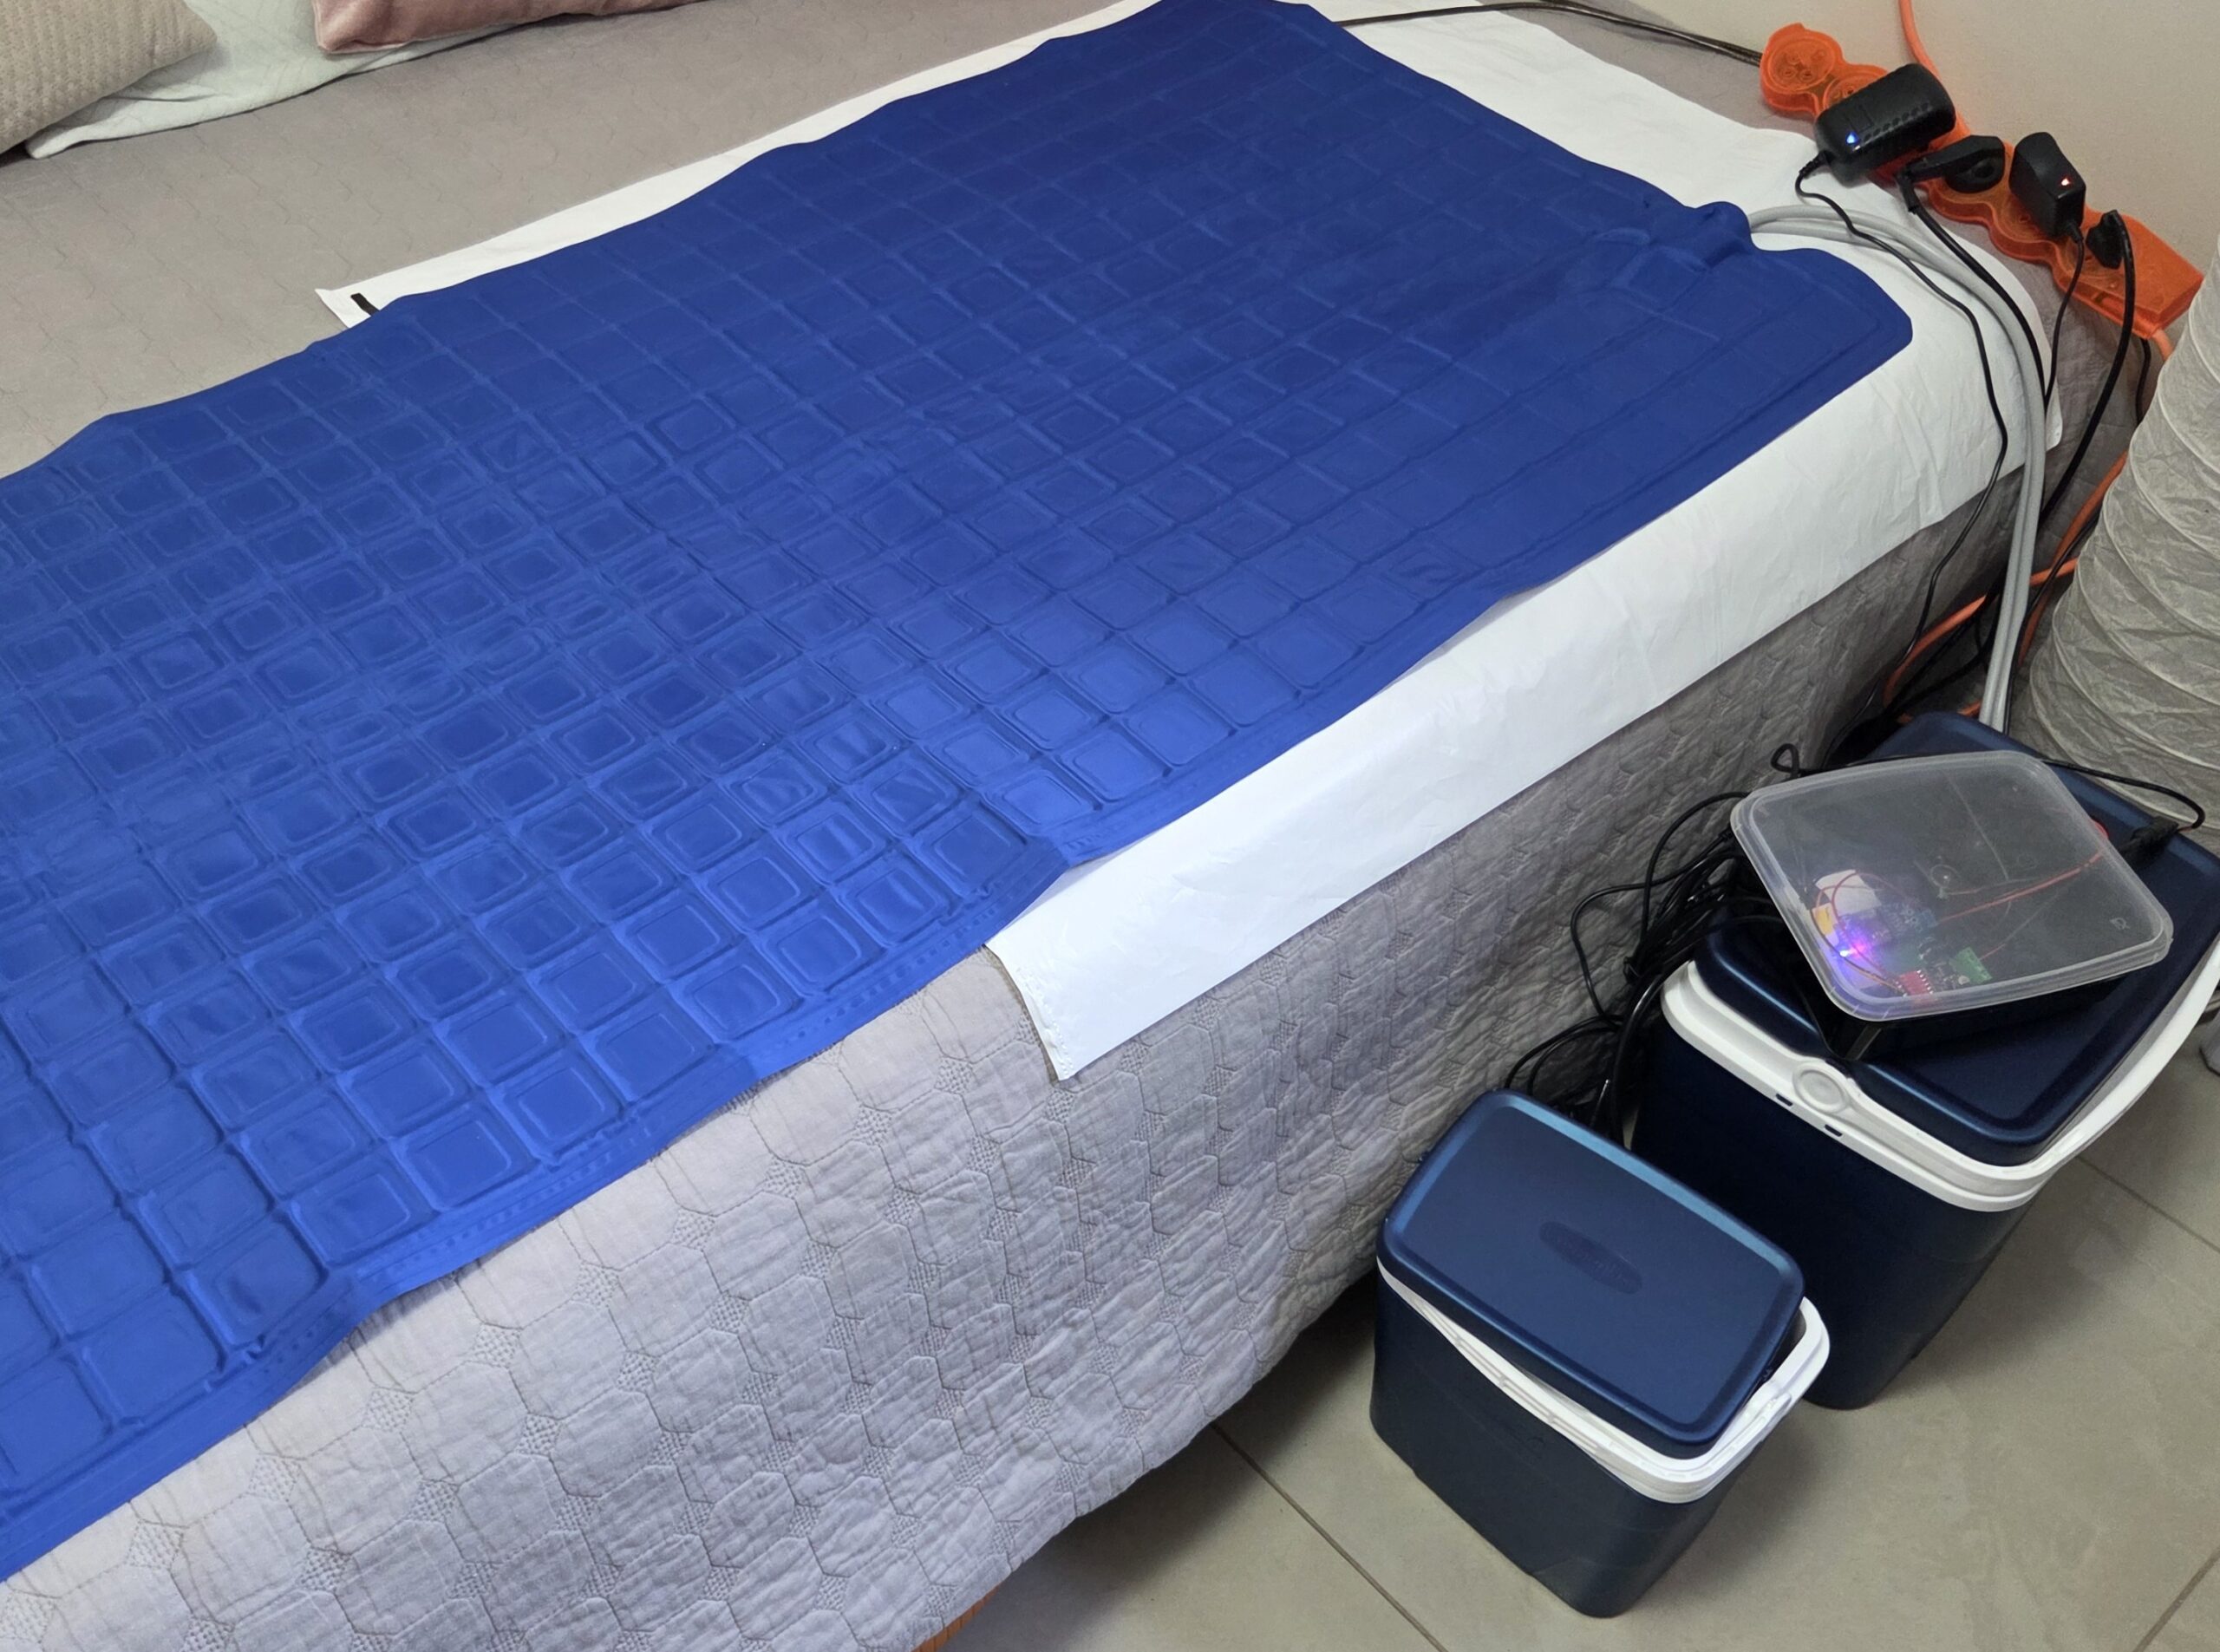
After building and testing several prototypes, this design proved to be simple, effective, and inexpensive. More importantly, I think there’s plenty of room for improvement, and that’s something the maker community does exceptionally well.
That’s why I decided to make the project open source.
The project is called AYG Cool Bed – because it’s a cool bed… pun intended.
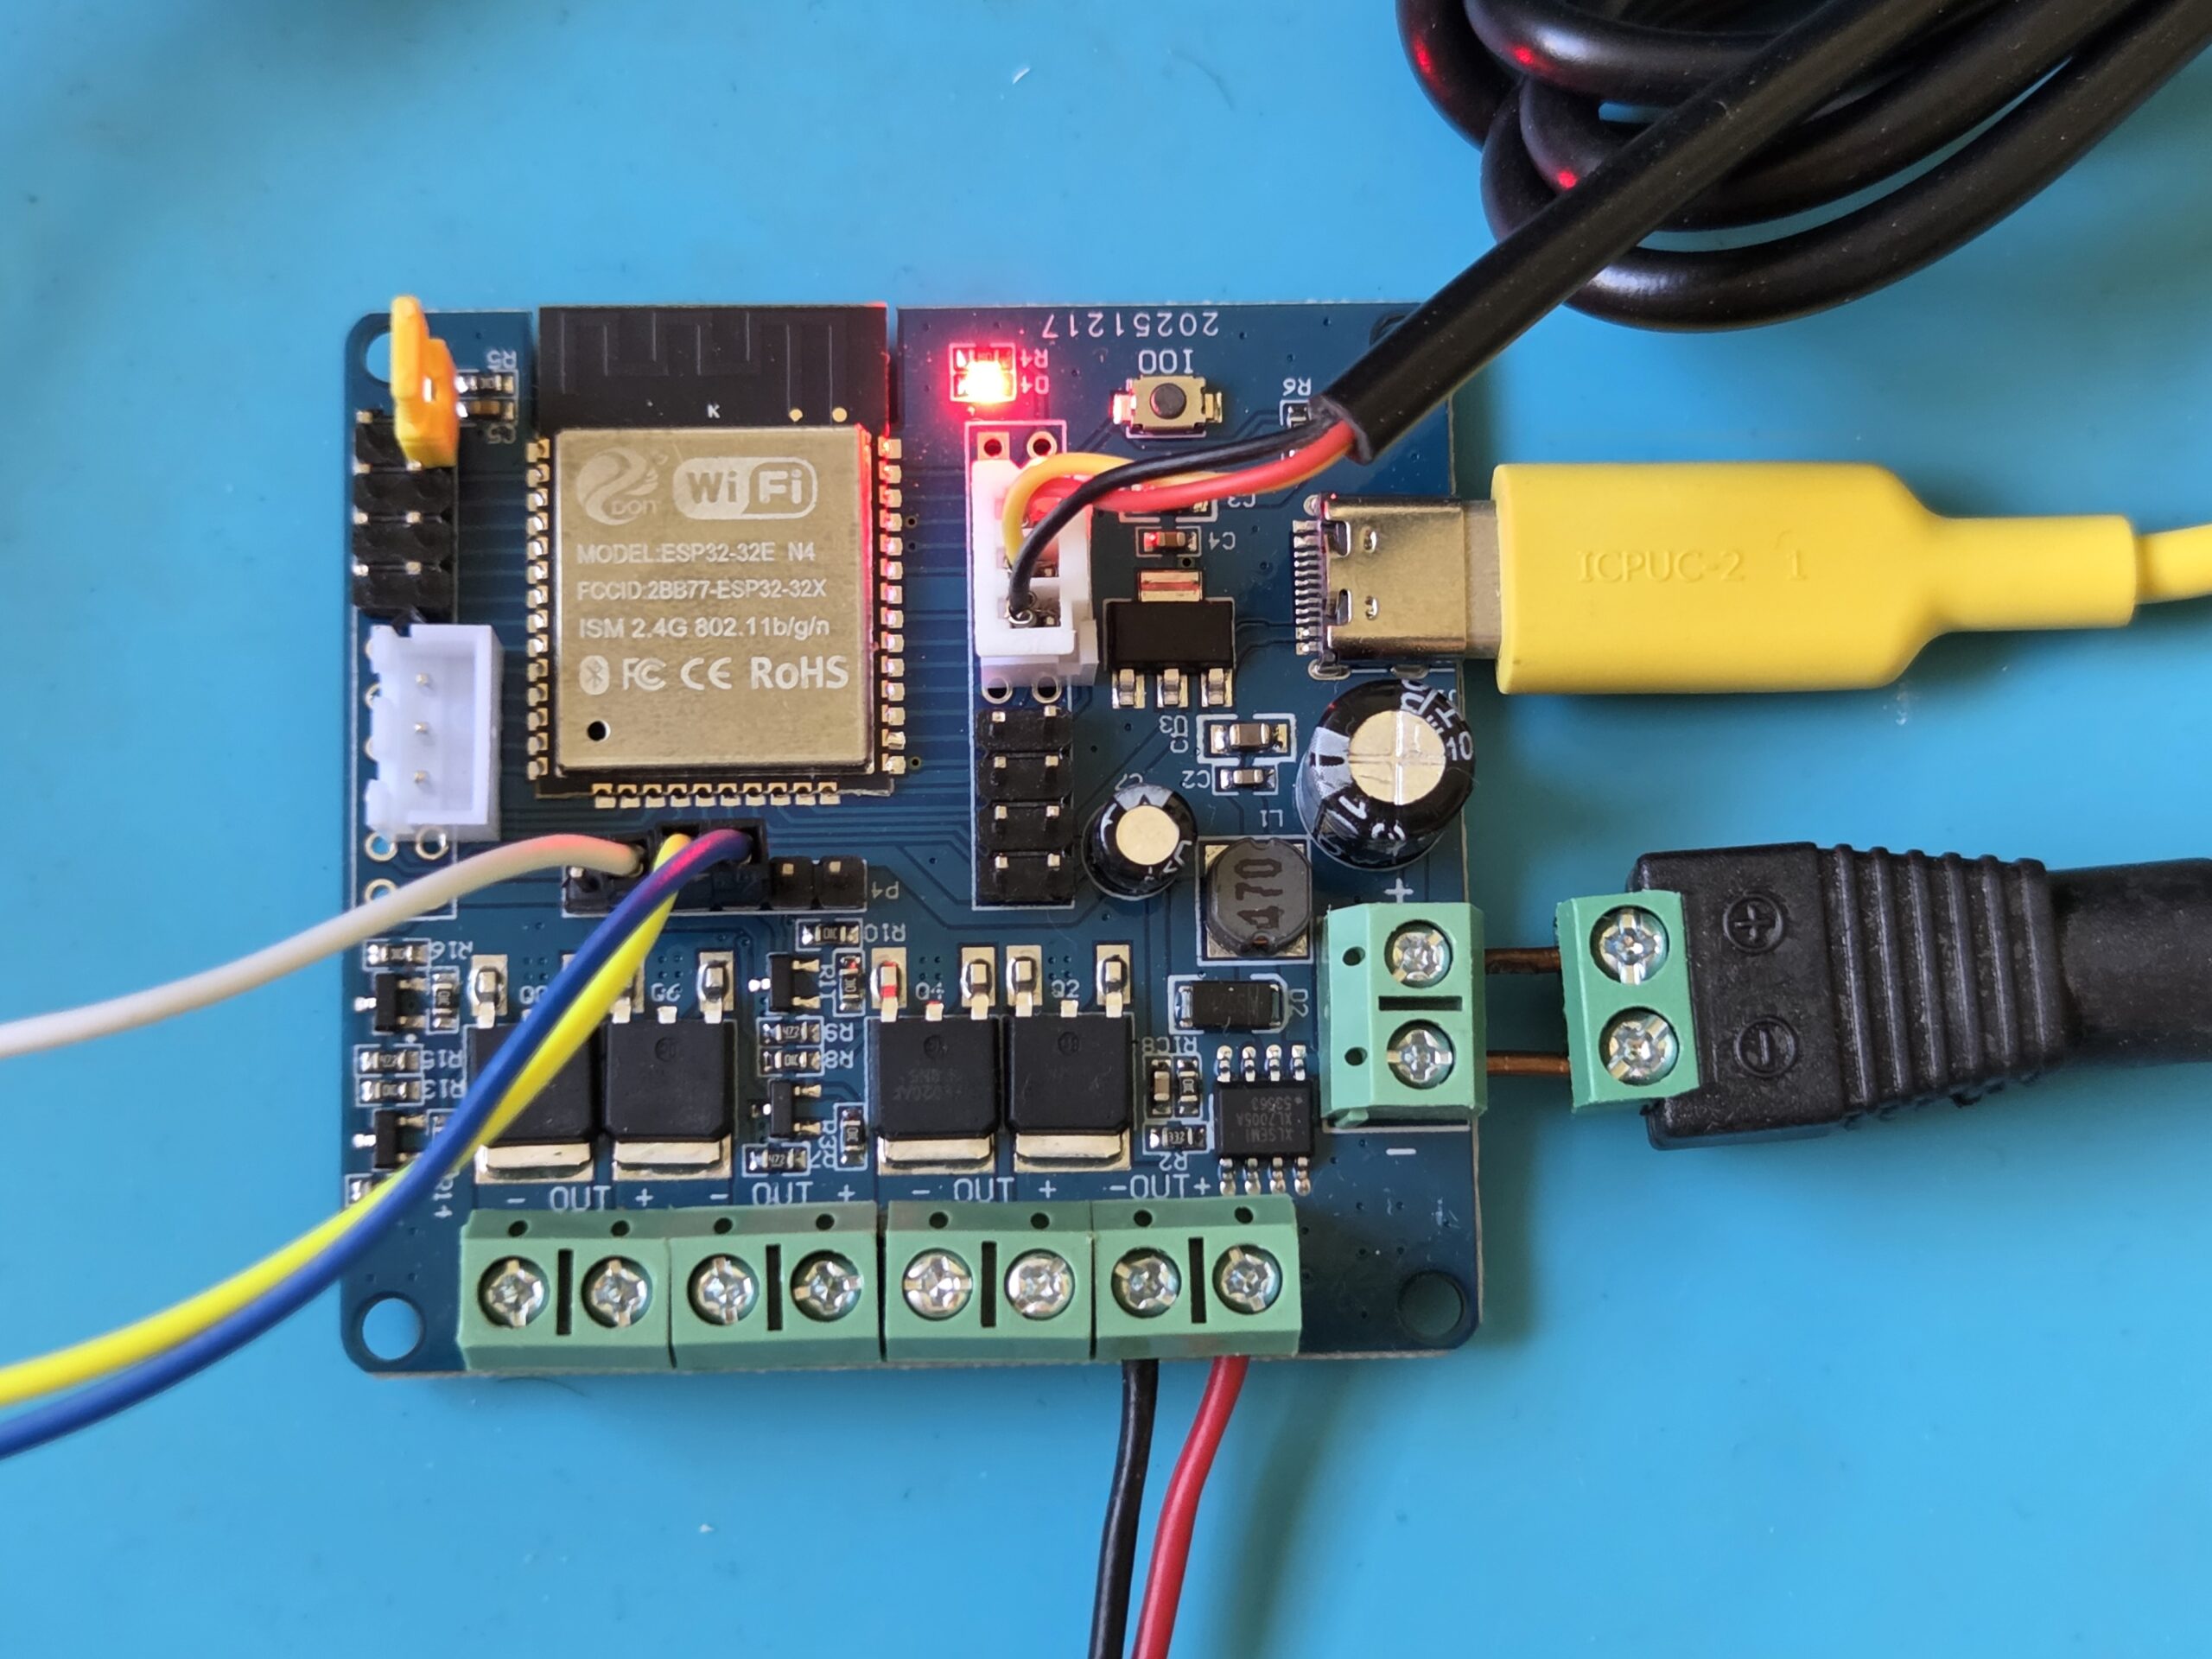
The controller is based on an ESP32, and both the firmware and hardware are designed to be easy to modify and extend. Whether your interests are electronics, firmware, mechanics, industrial design, or simply making things, I’d love to see what you can contribute.
Current Status
Project status (July 2026).
Hardware
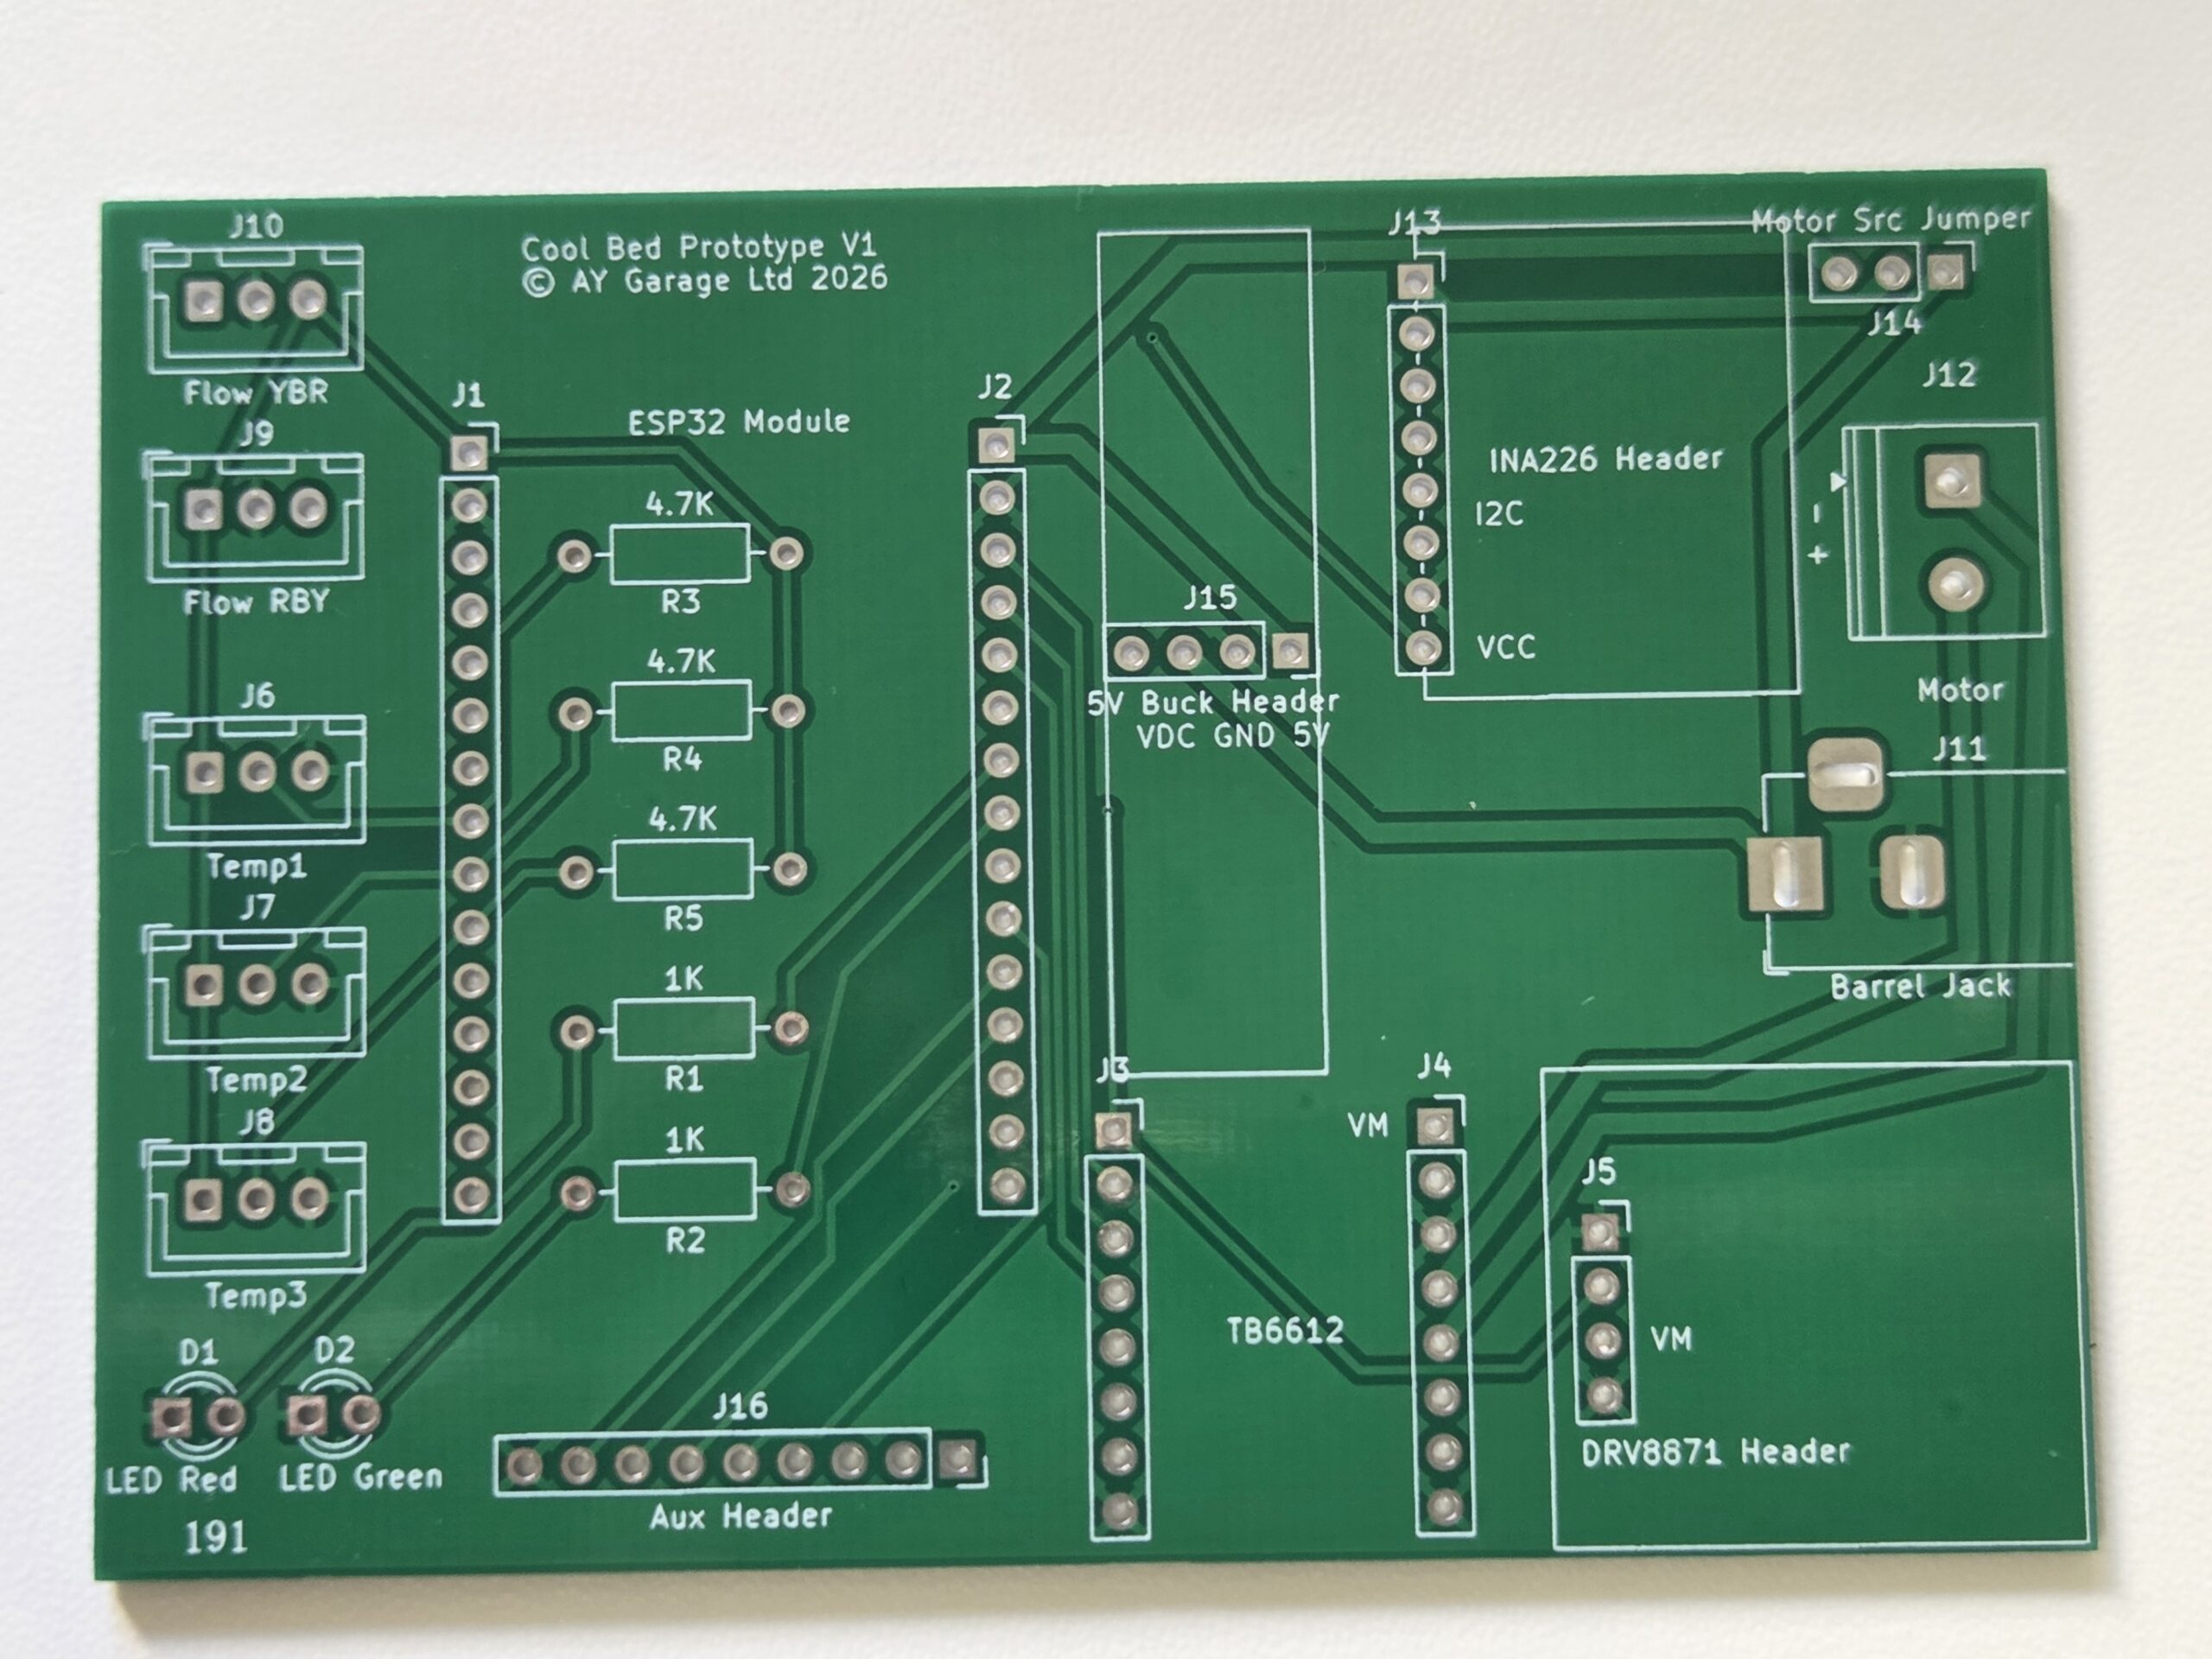
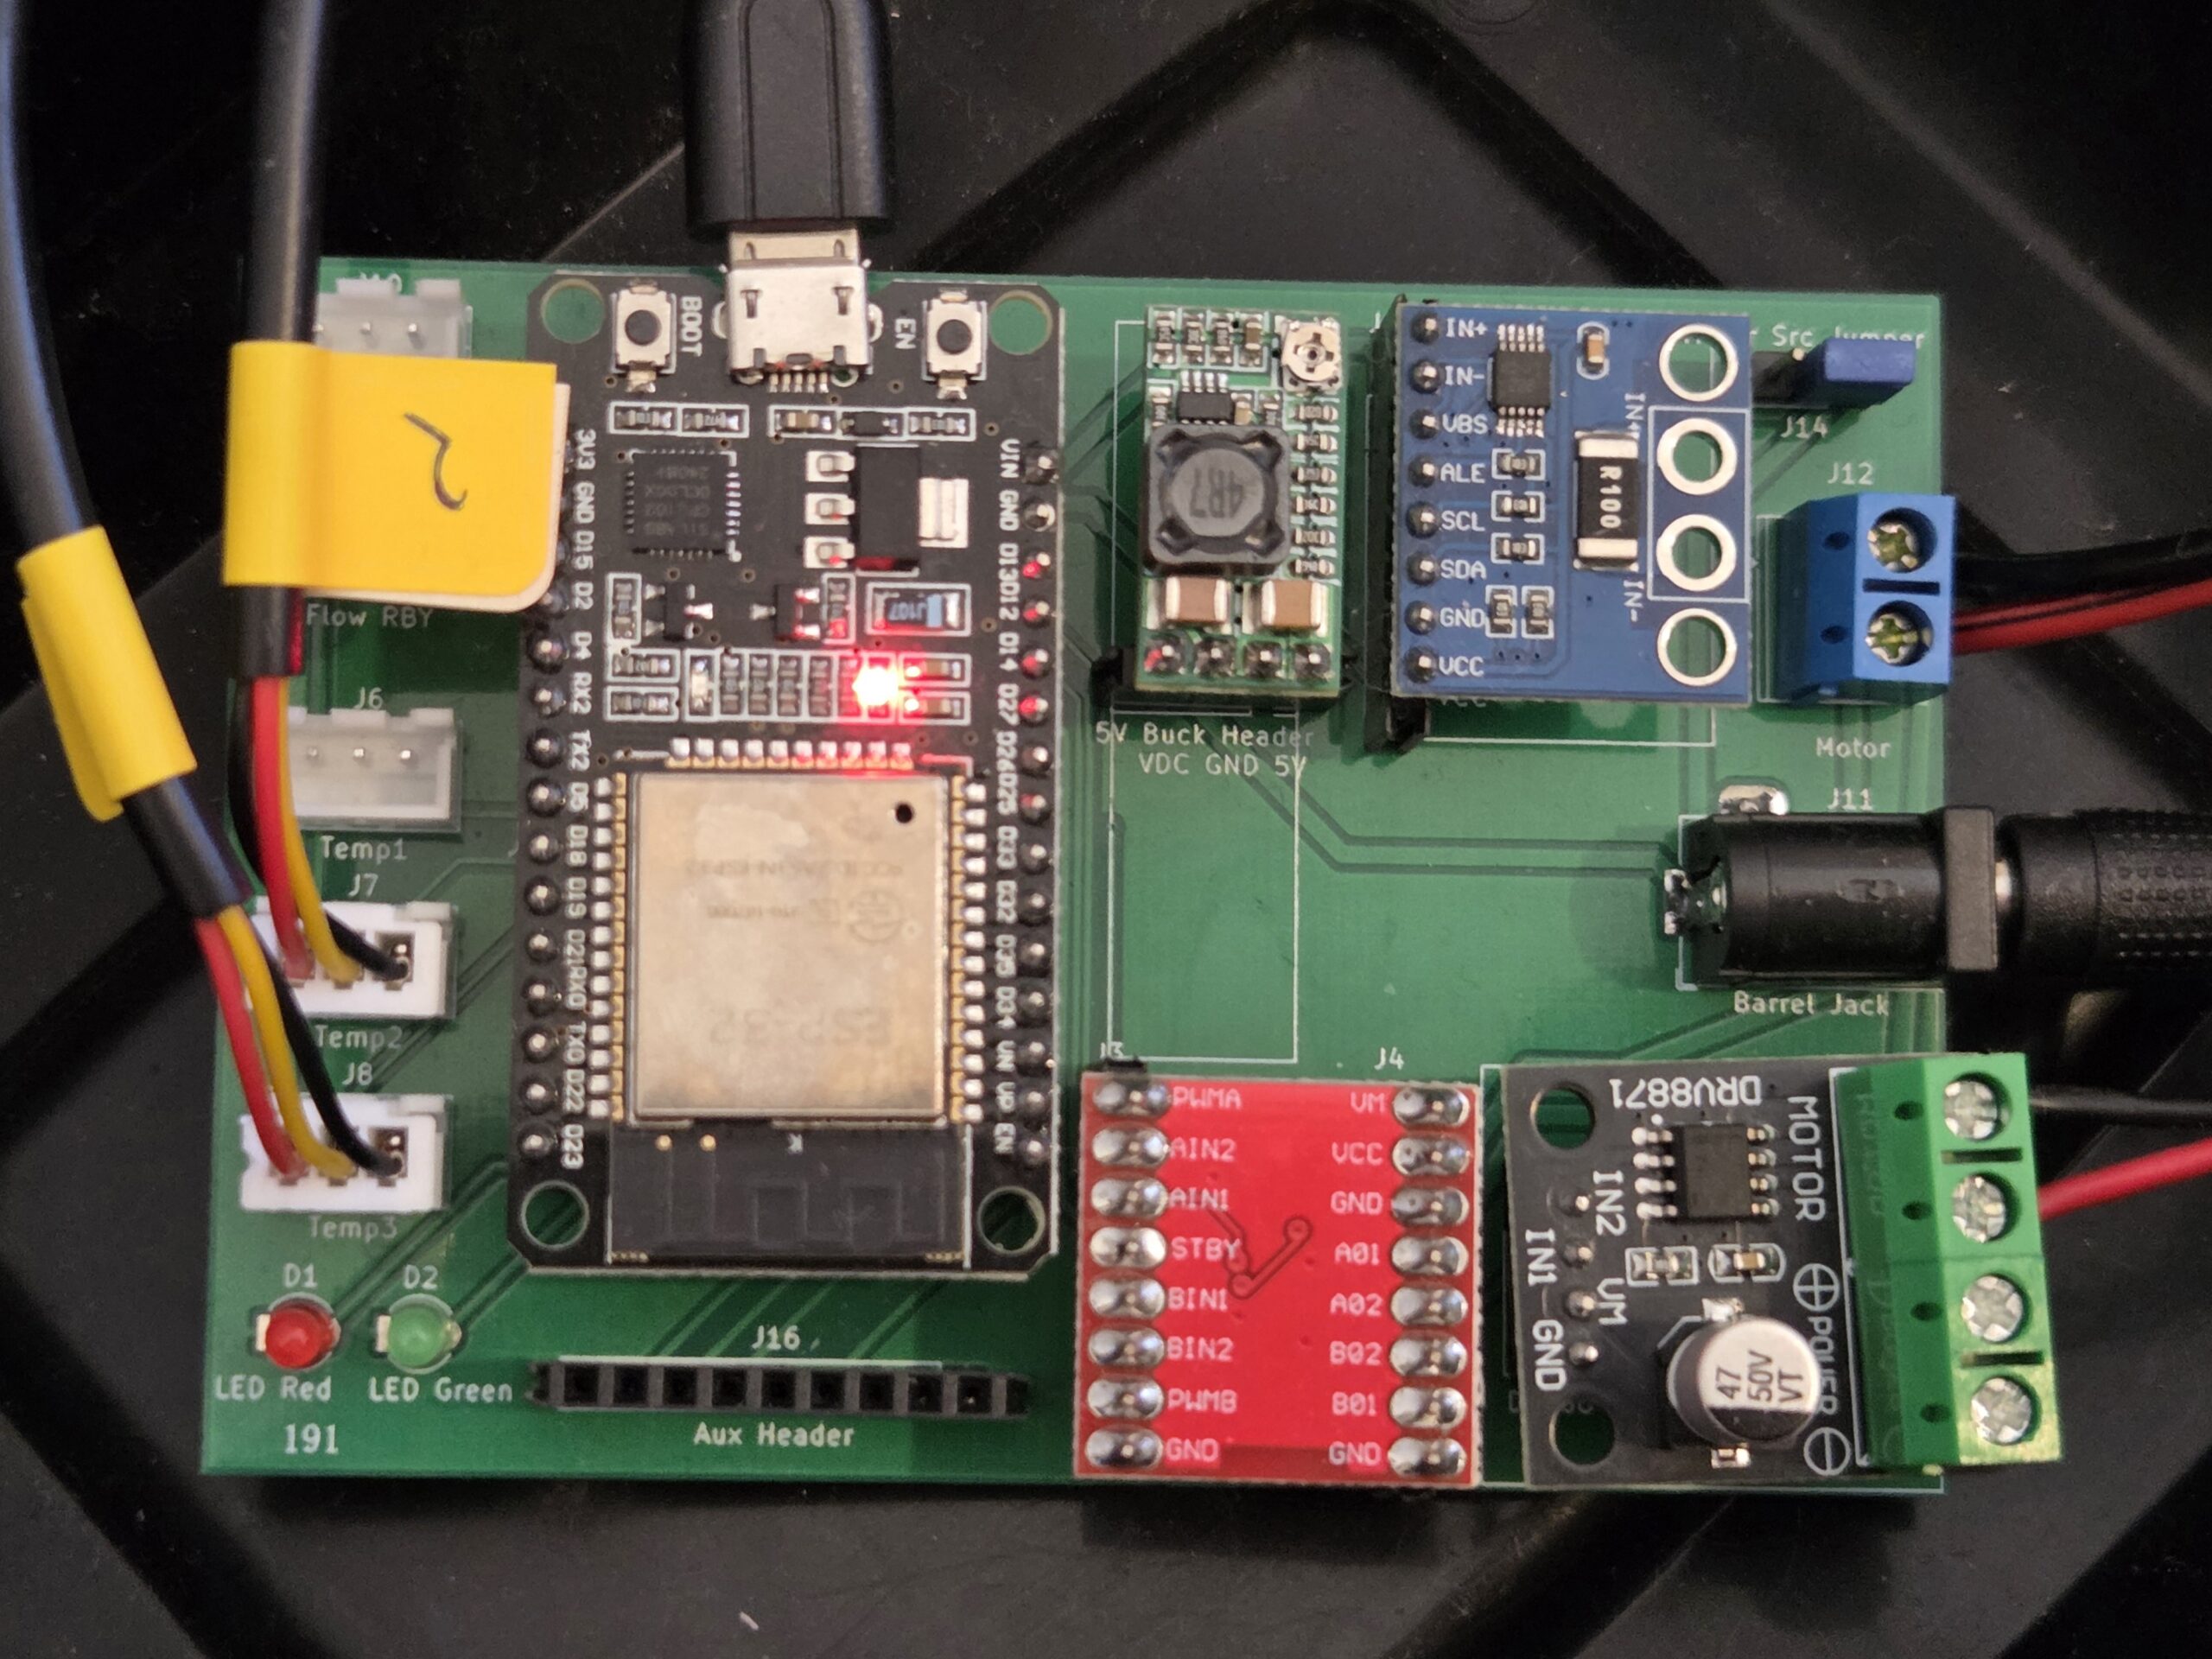
The project is intentionally built from off-the-shelf parts that can be purchased from Amazon, AliExpress, or your preferred supplier.
For the controller, I recommend using an ESP32 development board that already includes two or four MOSFET outputs for driving the pumps and, optionally, a heater. If you prefer, you’re of course free to design your own controller.
The project wiki contains the latest information on recommended parts, wiring, and assembly instructions.
Software
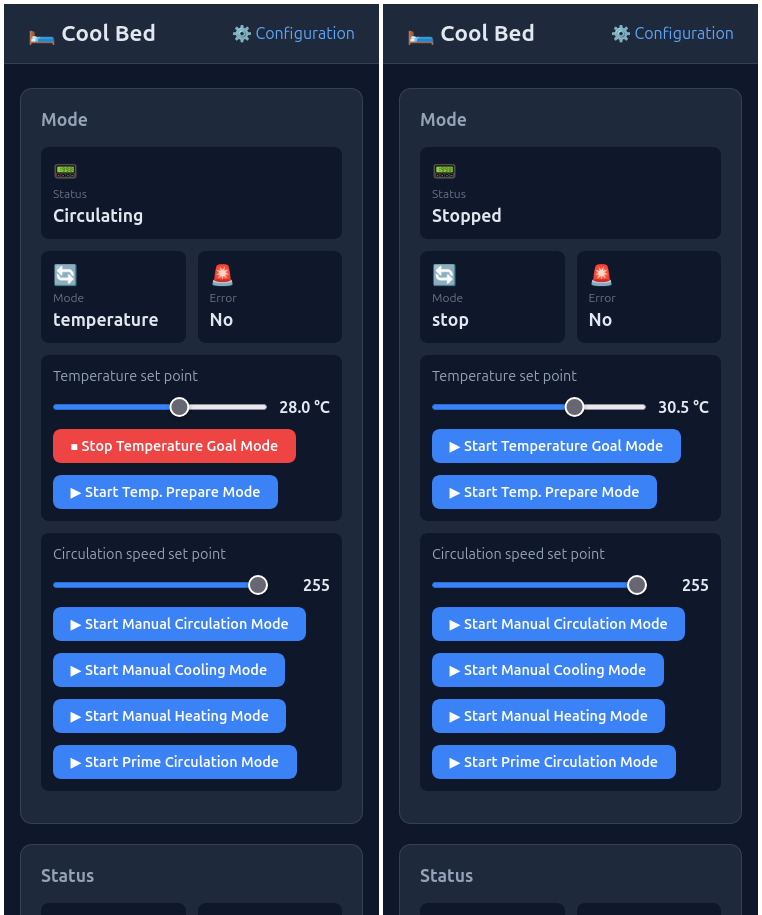
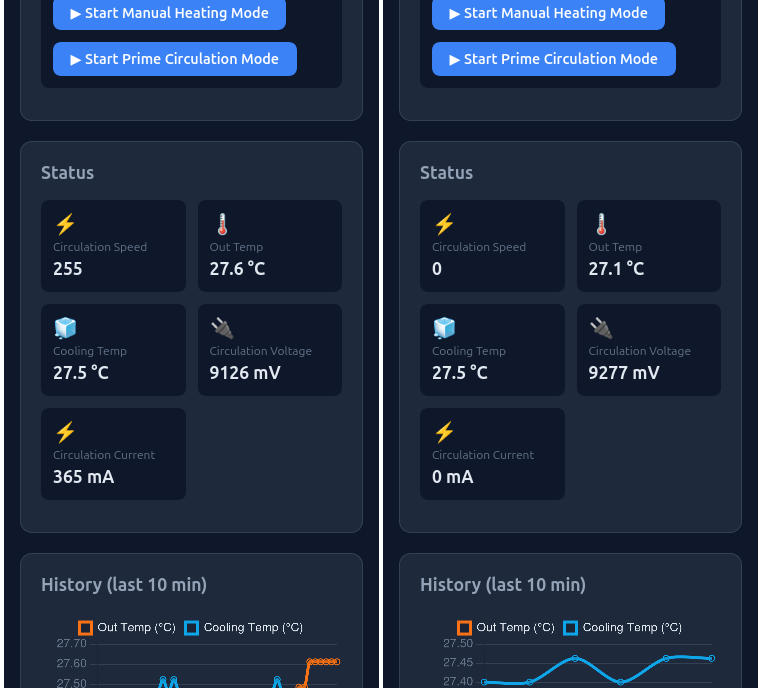
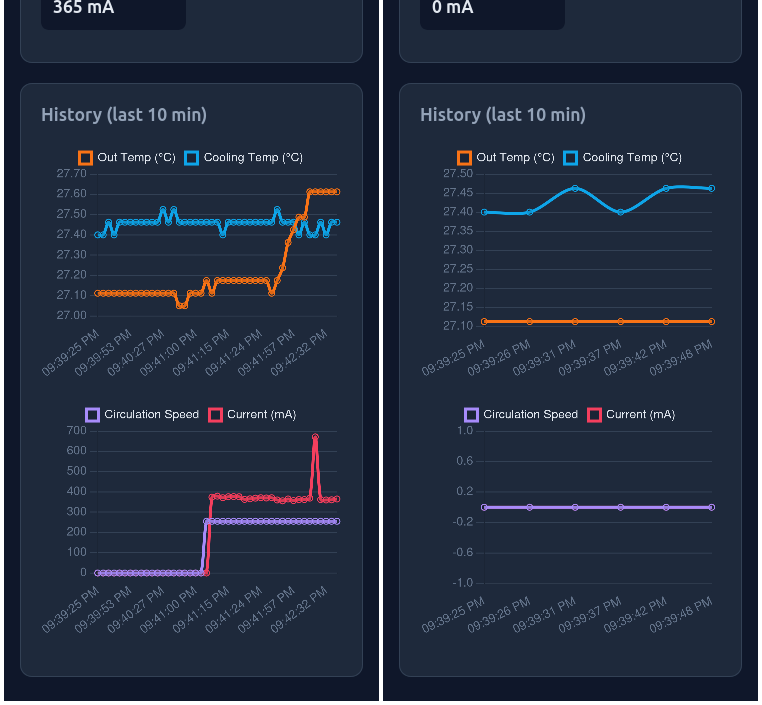
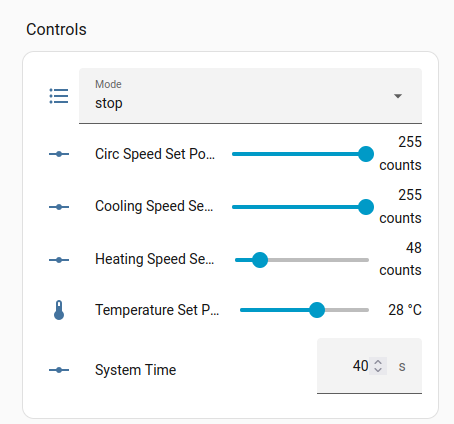
The controller runs firmware that I developed for the project. Once flashed, it connects to your local Wi-Fi network and provides a browser-based interface for configuration and control. No cloud service required.
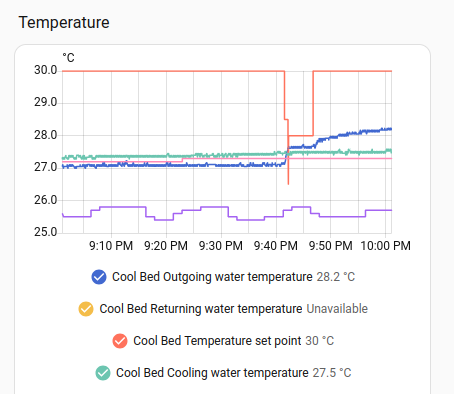
For Home Assistant users, the firmware also includes an optional MQTT interface compatible with Home Assistant auto-discovery. This allows you to integrate the system into automations, schedules, dashboards, and other smart-home workflows.
Github
The firmware source code is available here:
I’m also documenting the hardware, build instructions, design decisions, and bill of materials in the project wiki:
Conclusion
My hope is that AYG Cool Bed becomes an affordable, open-source alternative to commercial bed cooling systems – especially for makers, DIY enthusiasts, and anyone who prefers to own and understand the hardware they use.
Advantages
- Runs entirely locally — no subscriptions, cloud accounts, or vendor lock-in.
- Fanless operation — quiet, with no heatsinks or fans collecting dust.
- Temperature-controlled — maintains a comfortable water temperature instead of simply circulating cold water.
- Uses frozen ice packs — simple, inexpensive, and energy-efficient.
- No evaporative cooling — doesn’t increase room humidity or expose the coolant to room air.
- Built from readily available components — inexpensive, repairable, and easy to modify.
- Closed-loop water system — minimizes contamination from dust and dirt.
- Built-in Wi-Fi — no proprietary hub required.
- Multiple control options — use the built-in web interface, Home Assistant, or MQTT.
Drawbacks
No design is perfect. This one has a few trade-offs:
- Ice packs need to be frozen ahead of time.
- Priming the water loop can sometimes be inconvenient.
- Pumps and other components are consumable and will eventually require maintenance or replacement.
- The coolant should be distilled water and should be replaced periodically.
- Containers and the final enclosure are left up to the builder.
- Support comes from the community rather than a commercial company.
How You Can Help
I’d love to see this become a community-driven project. If you’d like to contribute, here are a few ideas:
- Build one and share your experience.
- Design attractive enclosures.
- Improve the “spouse acceptance factor” – or more generally, make the system easier to live with.
- Test different mattress pads, pumps, tubing, containers, and heat exchangers.
- Find better ways to keep the mattress pad flat and securely attached to the mattress.
- Reduce water-flow and pump noise.
- Identify better-performing or lower-cost components.
- Experiment with coolants, additives, and cleaning procedures.
- Develop additional Home Assistant integrations, such as using room temperature sensors, health trackers, or sleep data.
- Improve the safety of the electrical and plumbing design.
- Tell other makers about the project.
If you decide to build one, improve it, or simply have ideas to share, I’d love to hear from you. Feel free to leave a comment or contribute to the project.
Hopefully, together we can build an open-source bed cooling system that is affordable, hackable, repairable, and available to everyone.