A year ago I published an article about a very simple Vibration Logger using an Arduino Uno, an SD card and an accelerometer. Recently, the need to measure vibration came up again, but this time I wanted something better. A device that will let me monitor the readings from anywhere without the need to go and read the data off an SD card at the deployment location. Furthermore, the use-case is sporadic and the location could be one without Wi-Fi coverage, so it needed to be a cellular device.
tl;dr the solution is comprised of a Thingy:91 by Nordic Semiconductor with a custom firmware based on a nRF Connect SDK (ncs) sample. The device already has all hardware components needed, so it is truly, fully off-the-shelf hardware. The device sends high frequency data to the ThingsBoard cloud over CoAP and a low frequency stream of data to the nRF Cloud over MQTT.
This was a DIY project because of a good fit between existing skills, hardware laying around and what was needed for the task. As for alternative ways for achieving the same goal, I am planning to discuss DIY or buy considerations in a future article.
As with any project, we have to start with project requirements.
Requirements
I was looking to create a solution with the following features:
- A device that iincludes:
- a sensor able to measure vibration.
- Cellular modem.
- Inexpensive.
- Battery-powered (can operate for a few days without charge).
- Self contained.
- Can collect measurements (samples) and upload them to a server (the cloud).
- Sample collection at a frequency of 1 sample every 1-20 seconds.
- Latency of less than 10 minutes, preferably less than 1 minute.
- Web interface where the results can be visualized as a graph in near real-time.
- Back-end that can store at least a week of data.
- Minimal amount of work.
- Maximal amount of reuse (software, hardware, parts, etc).
- One-off.
The use case will be:
- Installing the vibration sensor device on the device under test.
- Monitoring the data online and in real-time.
- After a few days, removing or charging the device.
- Relocating the sensor to another location and repeat.
Technical design
Based on the requirements there are several interconnected components:
- A physical device
- Communication protocol
- Back-end server
- UI
The device
For the device, I chose the Thingy:91. Thingy:91 is a prototyping platform for the Nordic nRF9160 SiP (system in package). The nRF91 is a microprocessor with a cellular modem that is designed for low power applications and IoT. The Thingy adds sensors, a battery, an enclosure to the nRF91 to create a capable device that can be programmed to do various things. It is worth mentioning that there are other devices in the Thingy line, such as Thingy:52 and Thingy:53 which are Bluetooth, Zigbee and Matter focused. At any time in this article when referring to the Thingy I am referring to the cellular Thingy:91.
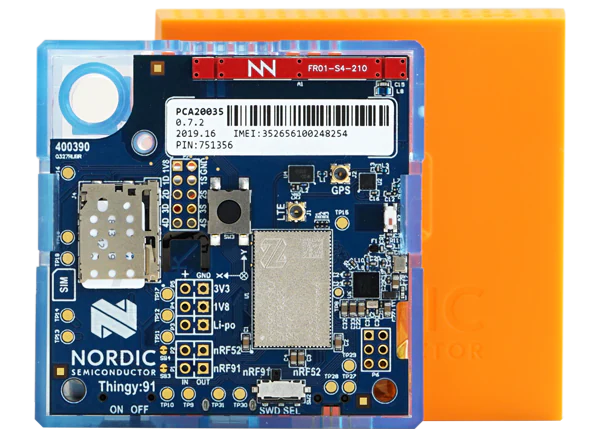
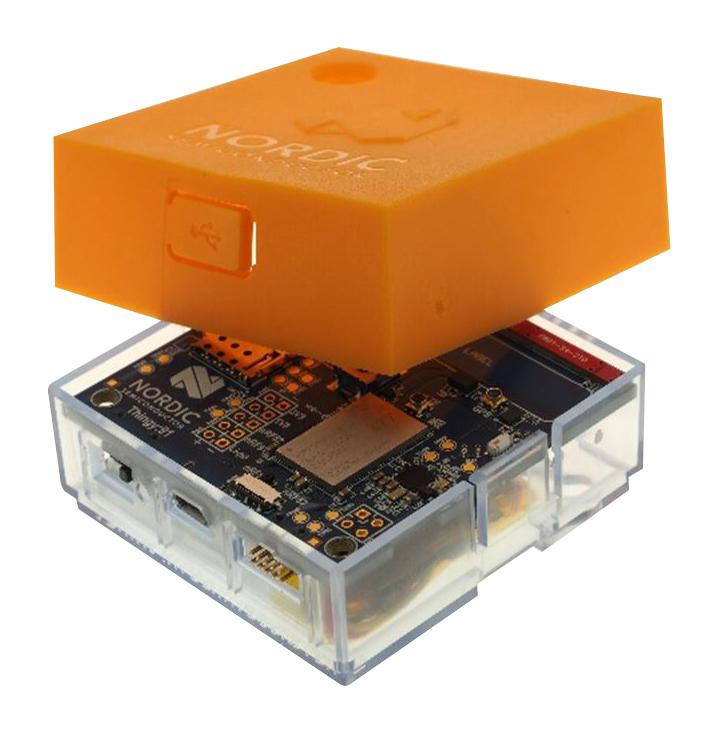
I chose the Thingy because it already had all the required parts for this project and I would not need to connect separate modules or solder anything. The Thingy has two accelerometers, a ADXL362 and a ADXL372 but the 372 is a high impact one, so I used the more sensitive 362 one. The Thingy also has an enclosure, a battery, LEDs and lots of open source code examples. The Thingy costs around $120 but I had one from another project that made the decision even simpler. If you don’t have a Thingy already it might be a good investment. Because it is a general, multi-purpose device, you can use it as a vibration sensor today and as something else tomorrow.
Communication protocol
Many IoT devices report metrics that change slowly over time, like temperature, or only report events, like opening/closing the door. Not in this case. Here I was aiming for a solution that could track a metric as frequently as 1hz. This can translate to a significant amount of data that can tax our connection, data plan, back-end server and more.
Another difficulty when you mostly rely on off-the-shelf software is that you are limited to protocols that are supported by your device, your back-end and their software. All these choices are inter-related in the end.
The protocols I considered were:
Where the payload would be JSON, protobuf or some custom binary encoding.
Because the main data is a frequent time series and is not a data stream carrying commands or events, I decided that reliable transmission is not a requirement. I also decided not to require encryption due to the same reasons plus this being a DIY and not a commercial product. All this helps to reduce overhead and we can ignore HTTPS, MQTT over TLS and CoAP over DTLS which we would otherwise have to use.
Bandwidth
If we report one sample every 10 seconds, then after one month it will be 260K samples. The overhead of each sample really makes a difference here. If one sample needs 50 bytes then it will total to 13MB/mo. However, if one sample needs 1000 bytes, then the total jumps up to 260MB/mo, which could have significant costs, depending on your data plan. Transmitting more bytes can also reduce battery life and make it more difficult to operate in areas with low signal.
Batching and latency
One possible way to reduce bandwidth is to batch measurements together. That improves the data to overhead ratio. This would be important for a sensor that is used all year long rather than sporadically. The downside is that it will add latency to the data in the UI, such that you don’t necessary see the latest measurements that occurred. I decided not to implement batching but this is something that can be added in the future if needed.
Back-end and UI
For this project to make sense time-wise, I had to make use of existing solutions for back-end and front-end (UI). Preferably two parts that are integrated. This is true even for commercial projects. It doesn’t make sense to develop things that are already available as commodity services at competitive prices.
I was also deliberating whether to use a cloud service or to host some package on my own existing computing resources, both strategies were an option, but I was leaning towards a cloud service for two reasons. First, I didn’t want to expose services in my personal network to the Internet, and second, getting something that is already deployed would mean less work to install and configure.
I have considered the following solutions:
- AWS – the services provided were too low-level for this project, but might be a good solution for a commercial product where a high level of customization is needed.
- InfluxDB + Grafana – proprietary protocols, complex, connection based protocols.
- Home Assistant – need to develop some sort of adapter/importer to proxy data from the Internet to the local network, as this is a local instance.
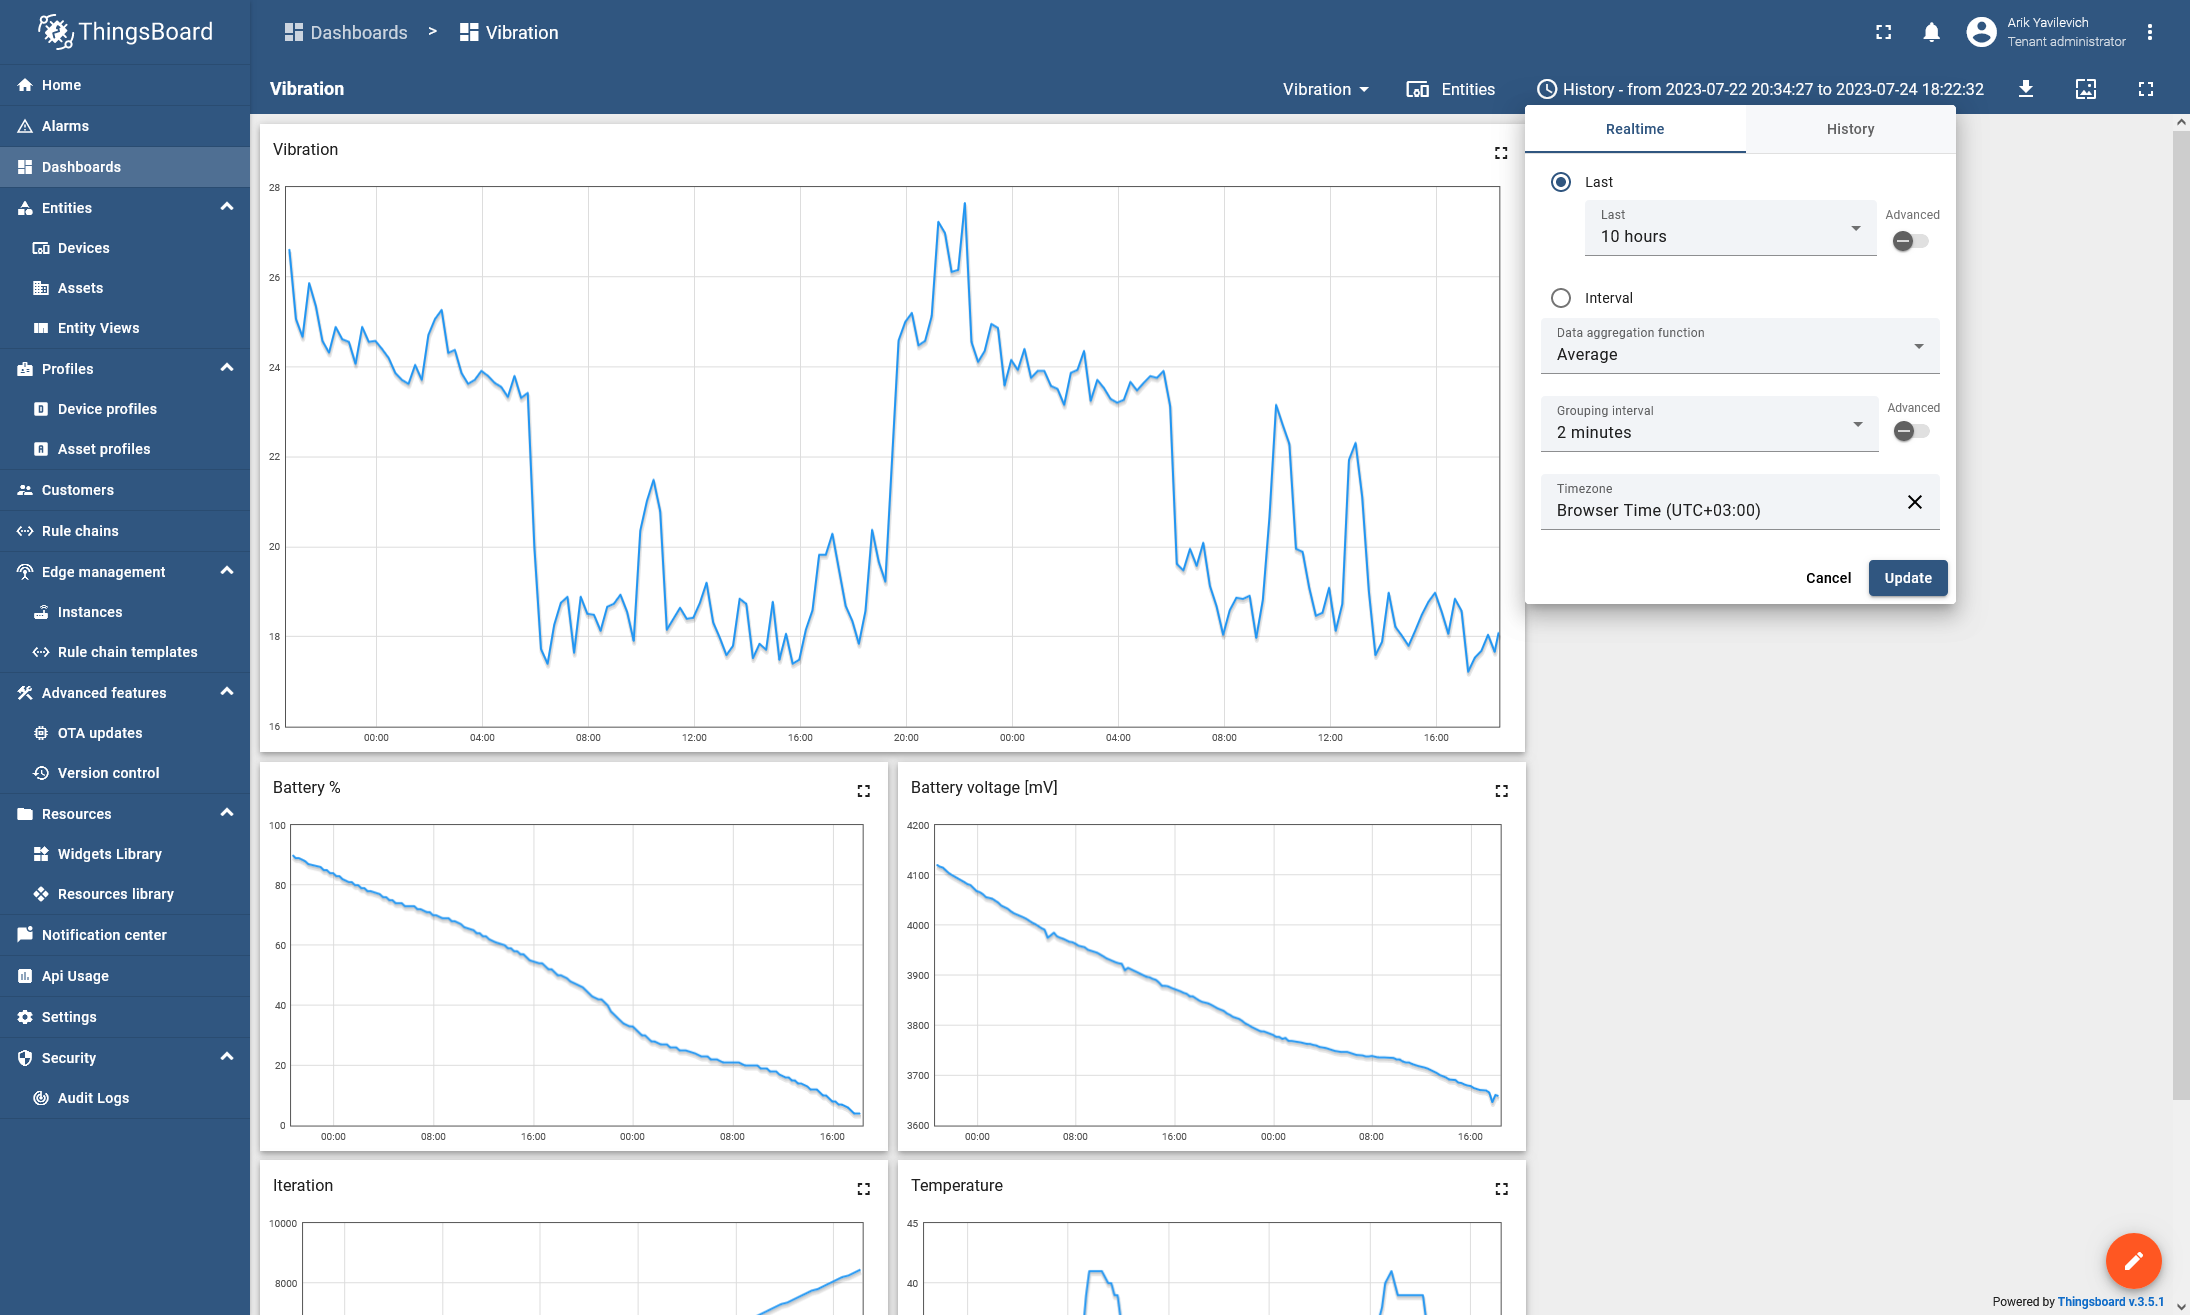
- ThingsBoard – back and front in one, good dashboards, CoAP support, decent demo functionality.
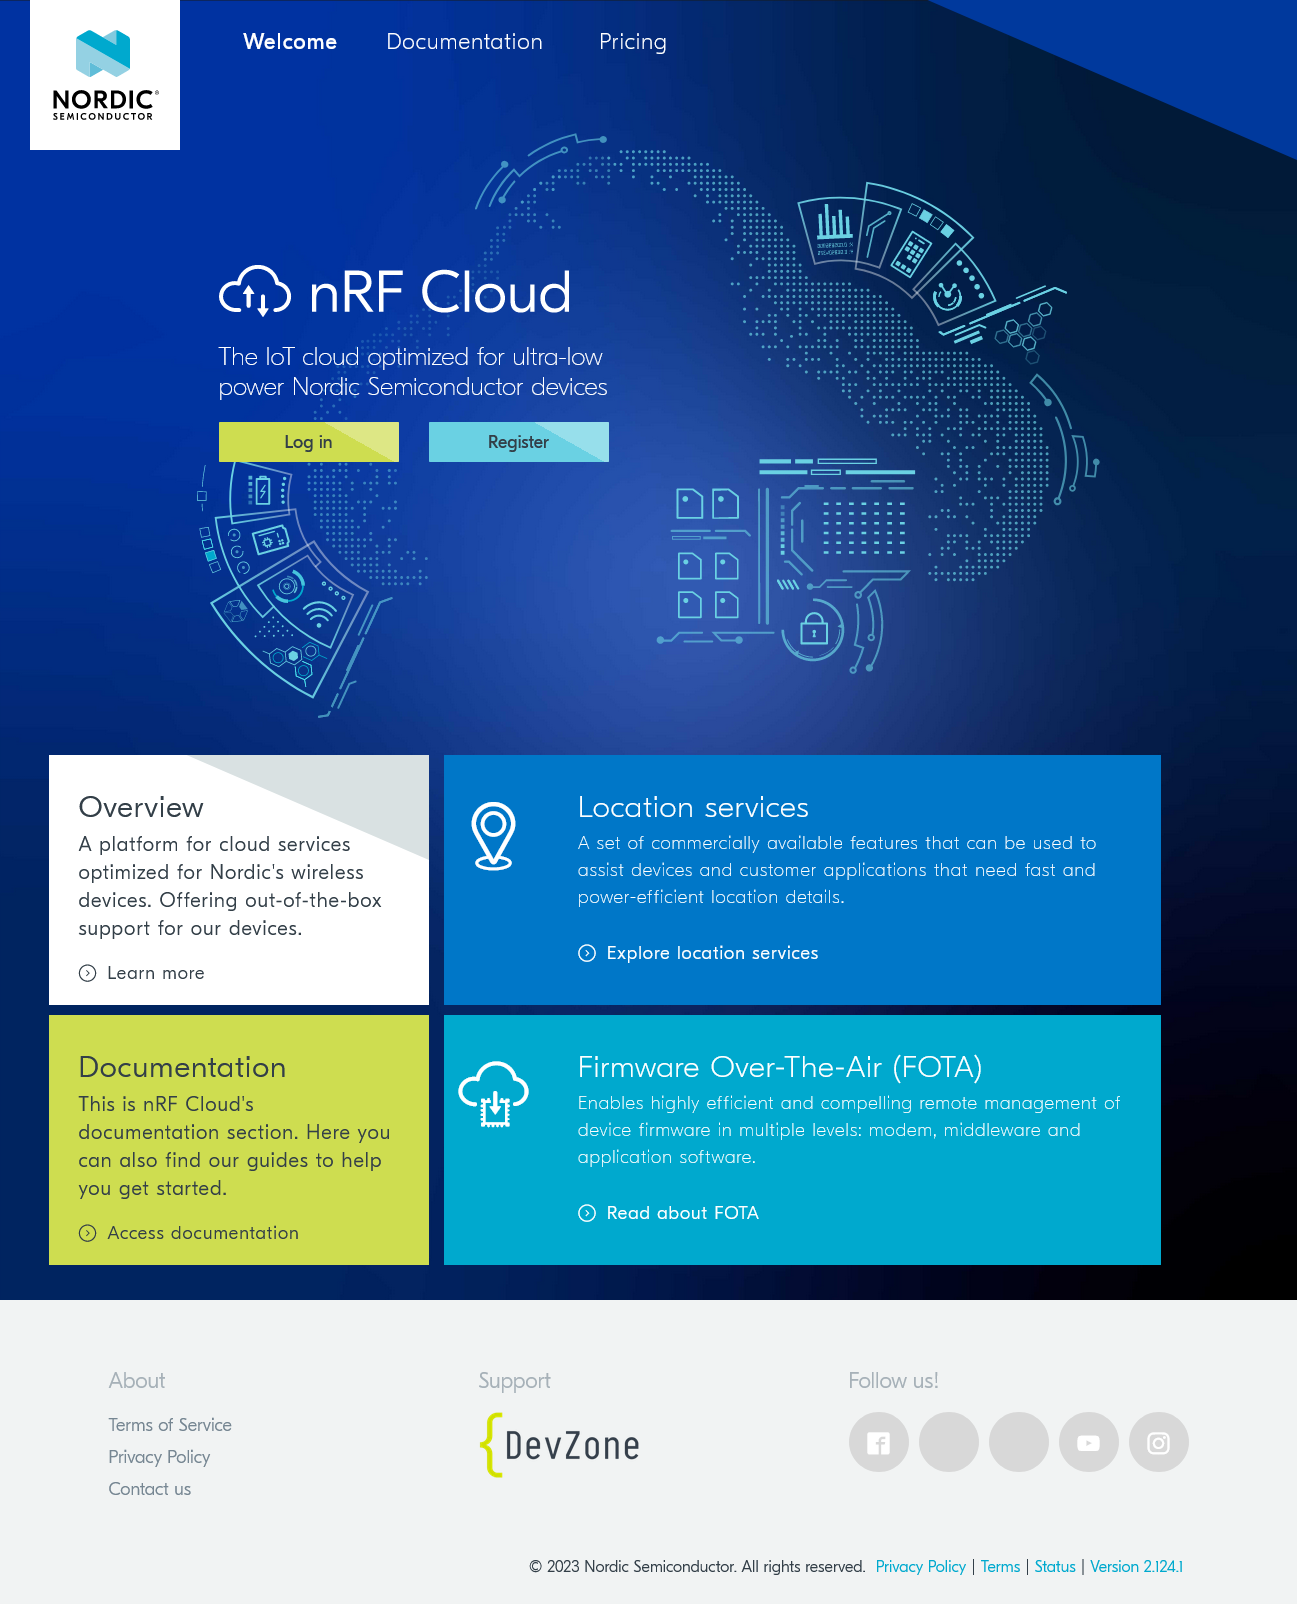
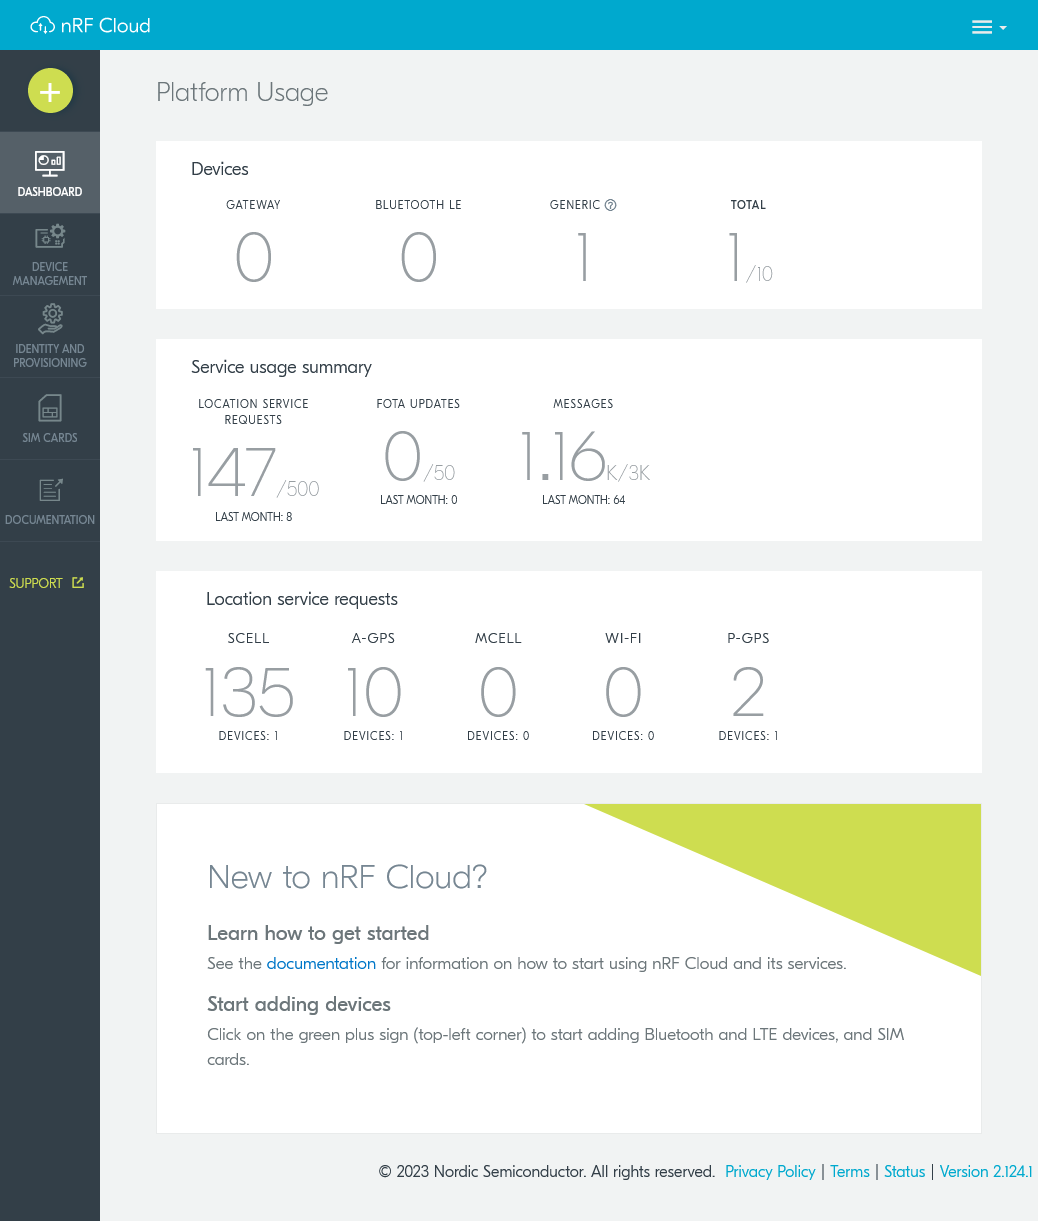
- nRF Cloud – lots of ready samples, graphs are limited, focused with location and FOTA, very limited free plan.
I chose ThingsBoard for the primary (high frequency) data stream due to the ability to use connection-less CoAP and due to the nice configurable UI. LMK if you want to recommend other services for this purpose.
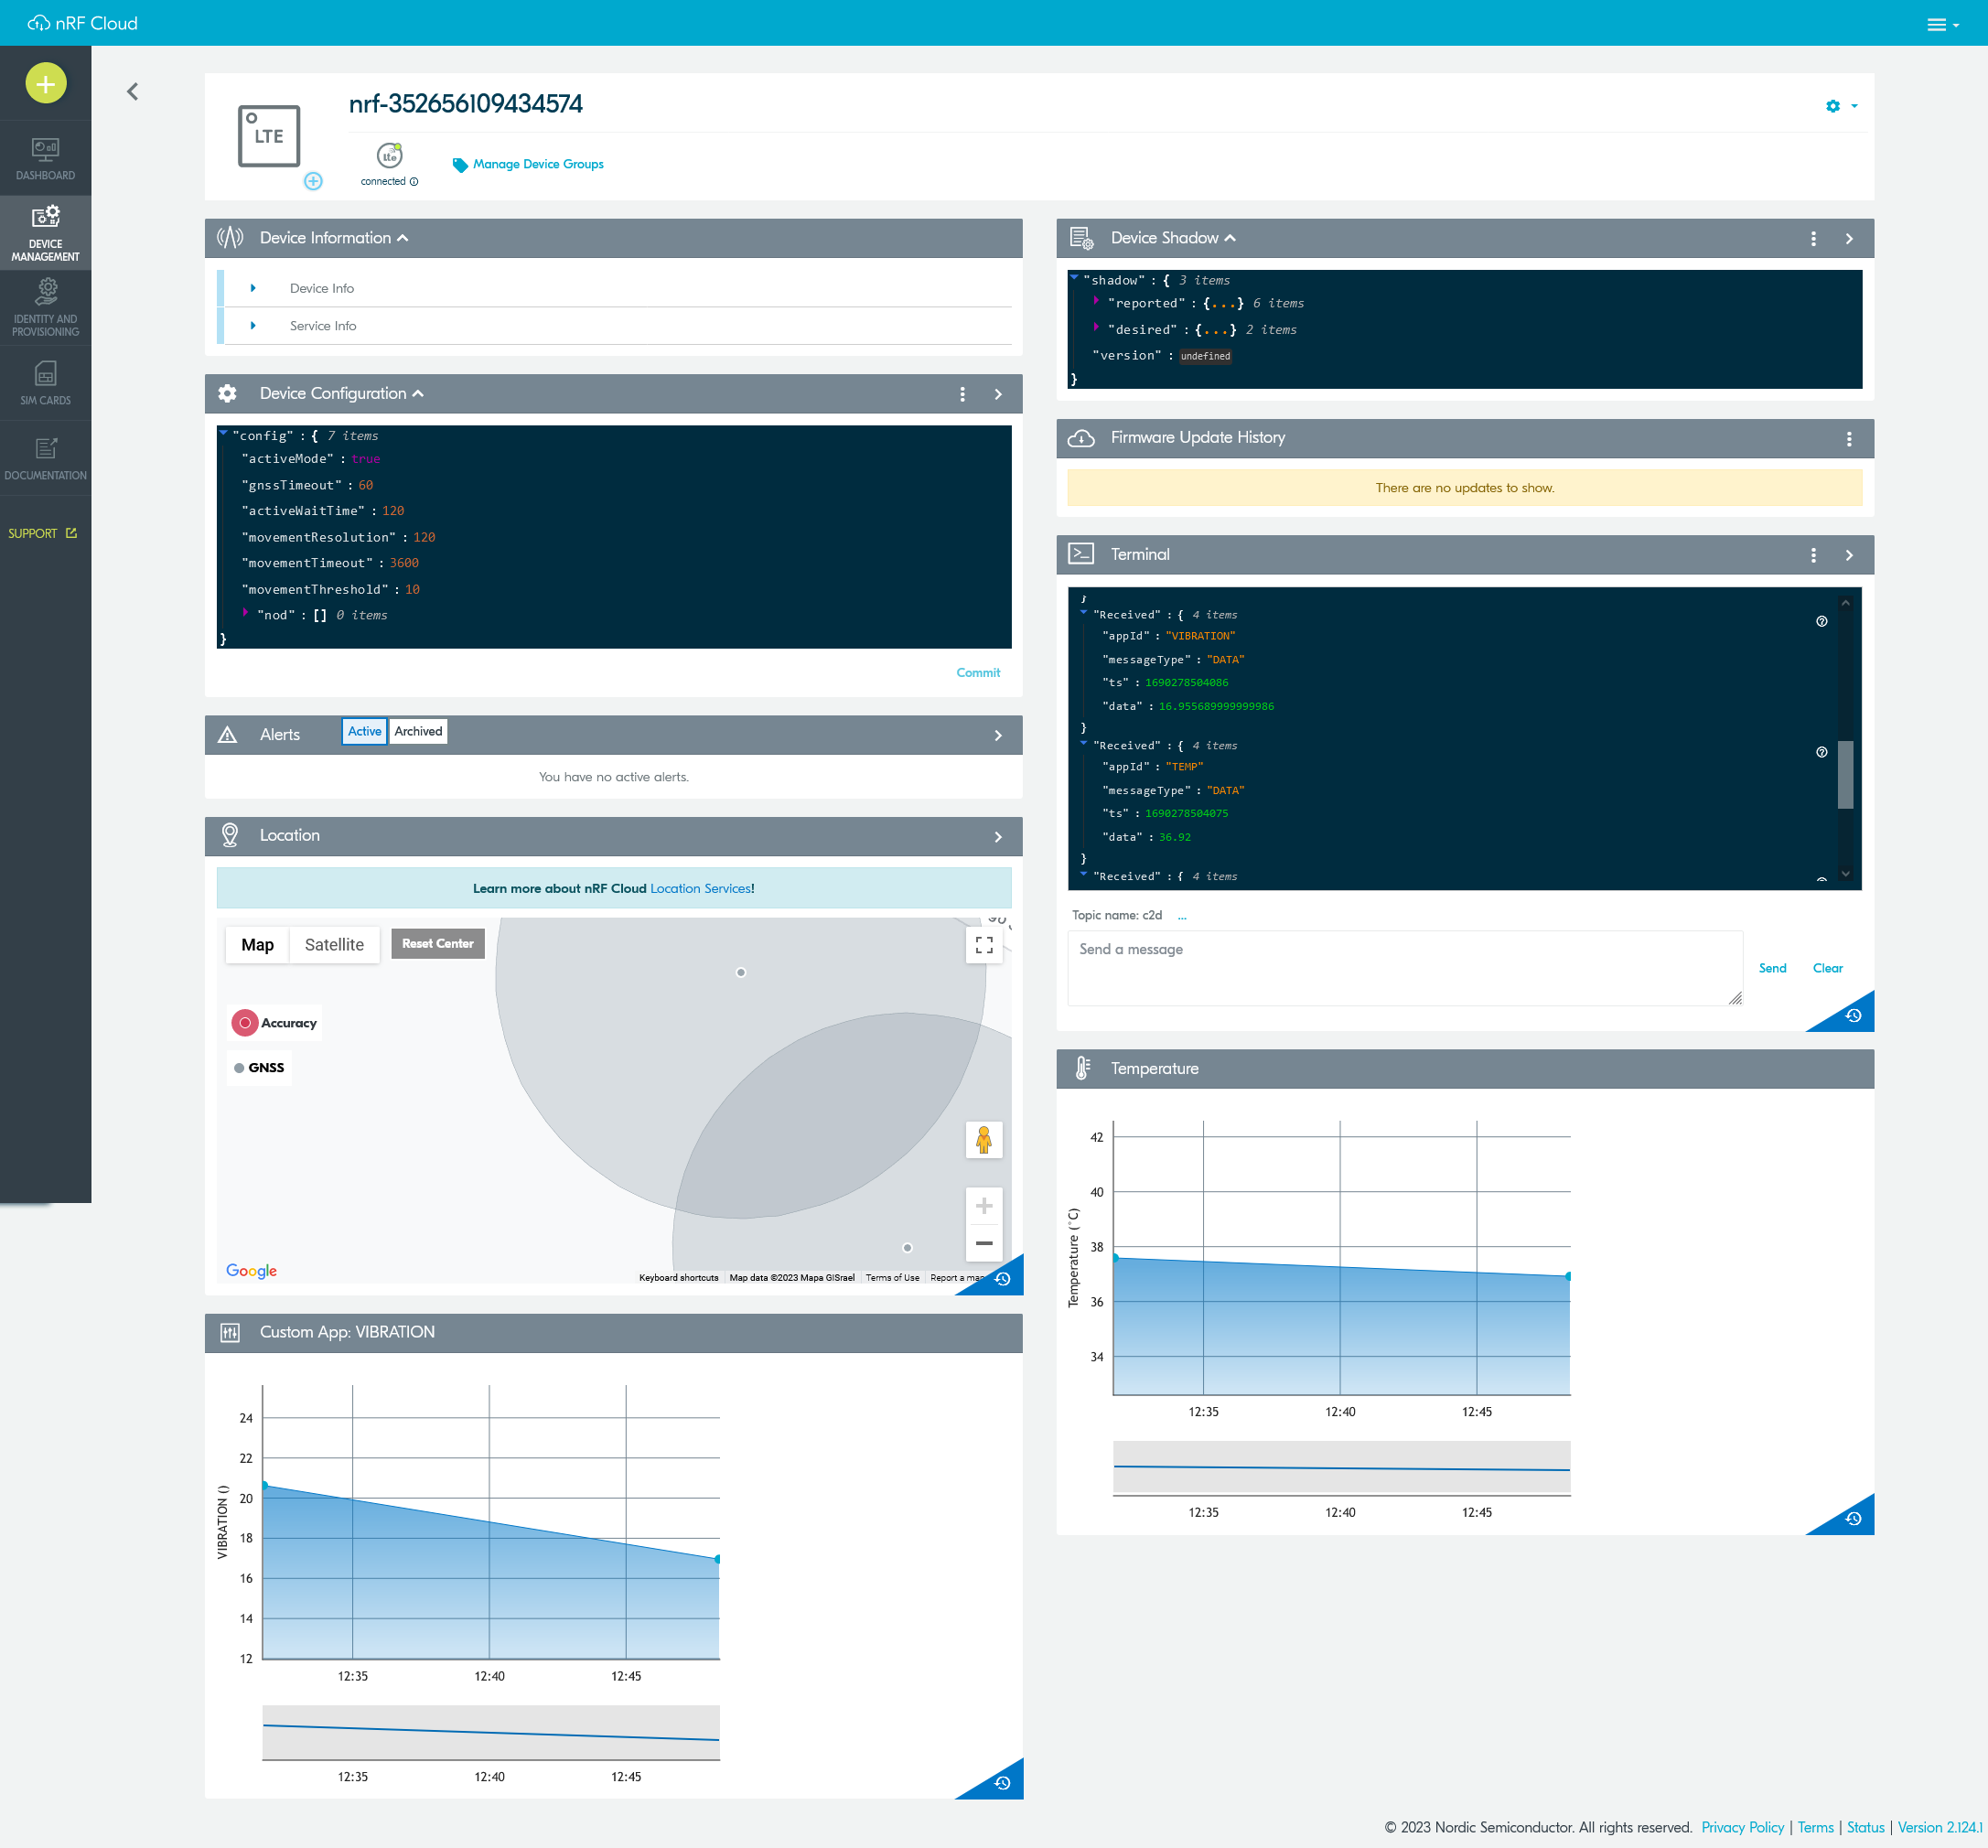
As a side effect that will be described in the next section, the solution also reports data at a low frequency (approximately every 15 minutes) to the nRF Cloud. Besides vibration data it is also beneficial to gather battery status, device location and other parameters that don’t change that much. The nRF Cloud integration transmits over a secure MQTT channel and also (optionally) allows for sending modem “AT” commands from the server to the device.
Implementation
So far I described the technical design and found several off-the-shelf components that we can use to implement the required solution. All the needed hardware is available. The back-end and front-end are available. I selected a communication protocol that is supported through the stack of the solution. The only part that I don’t have ready is software for the Thingy that will do what it is required for it to do. Software for an embedded device of a micro-controller is called firmware.
Firmware
The firmware for the nRF91, which is the core of the Thingy, is developed using the “nRF Connect SDK” which is a software development kit from Nordic Semiconductor. The NCS is based on Zephyr, an open- source Real-Time Operating System (RTOS). There are many firmware projects/samples for the Thingy that are open-source but none were doing exactly what is specified in the requirements. I decided to base the firmware of the project on the “nrf_cloud_mqtt_multi_service” sample, while also taking snippets from the “asset_tracker_v2” and “coap_client” projects. Doing that I didn’t have to spend time on dealing with the modem or LTE connection and could focus on my specific business logic.
Inheriting nRF Cloud functionality from the baseline source code allowed me to develop the sensing part separately from the communication part. At first I added support for sampling the sensor and calculating the vibration metric. The vibration metric is just a sum of the differences in the 3 axes of the accelerometer value between each two consecutive samples. With that value calculated I could upload it to nRF Cloud to confirm it is working and to have a mini POC. Once that was in place, I added support for the metric to be sent at higher frequency to the ThingsBoard server using CoAP protocol. The source code for the project is available in github.
Integrating the sensor
Sensors in Zephyr are abstracted by an API. The Sensors API allows using different sensors through a single interface while separating business logic, definitions and driver logic. The API allows for value reading on demand, as well as in response to triggers (movement, interrupts, etc). Adding support for an accelerometer (and similarly for other sensors) is comprised of 3 steps:
- Enable and configure the component in Kconfig. Kconfig defines configuration options for the driver, such as range, sampling rate, etc. In our project it is done in a Thingy specific conf file.
- Define the component in the devicetree. The devicetree defines the driver, physical connection type, pins, etc. In our project this is already defined in the DTS file of the Thingy. For a custom board you would have to define this in your own custom DTS.
- Calling sensor_* functions from the Sensors API. This is something you would have in the c code of your project, or in our case in vibration.c .
This model might seem strange to somebody used to a simpler and “flatter” model, such as one you have in the Arduino framework, where everything is just code. The Zephyr model is more sophisticated and makes it easier to change to another sensor IC model or another board without introducing code changes or branching in the code. The main cost of this abstraction is a steeper learning curve but there are many benefits, especially for larger projects.
Integrating CoAP
For CoAP, there are two APIs that are available, a lower level CoAP API that is part of Zephyr and higher level CoAP utils API that is an addition by Nordic and is part of the nRF Connect SDK. The higher level API provides the needed functionality for this project and will save us some work. I implemented c code to send data to ThingsBoard using the CoAP utils API. I used ThingsBoard’s telemetry upload CoAP end-point definition for details on how to format the uri and payload.
Connecting it all together
Some additional code in the main business logic loop helps glue it all together. It fetches values from the vibration component and battery management component and sends those at different intervals to the cloud.
Results
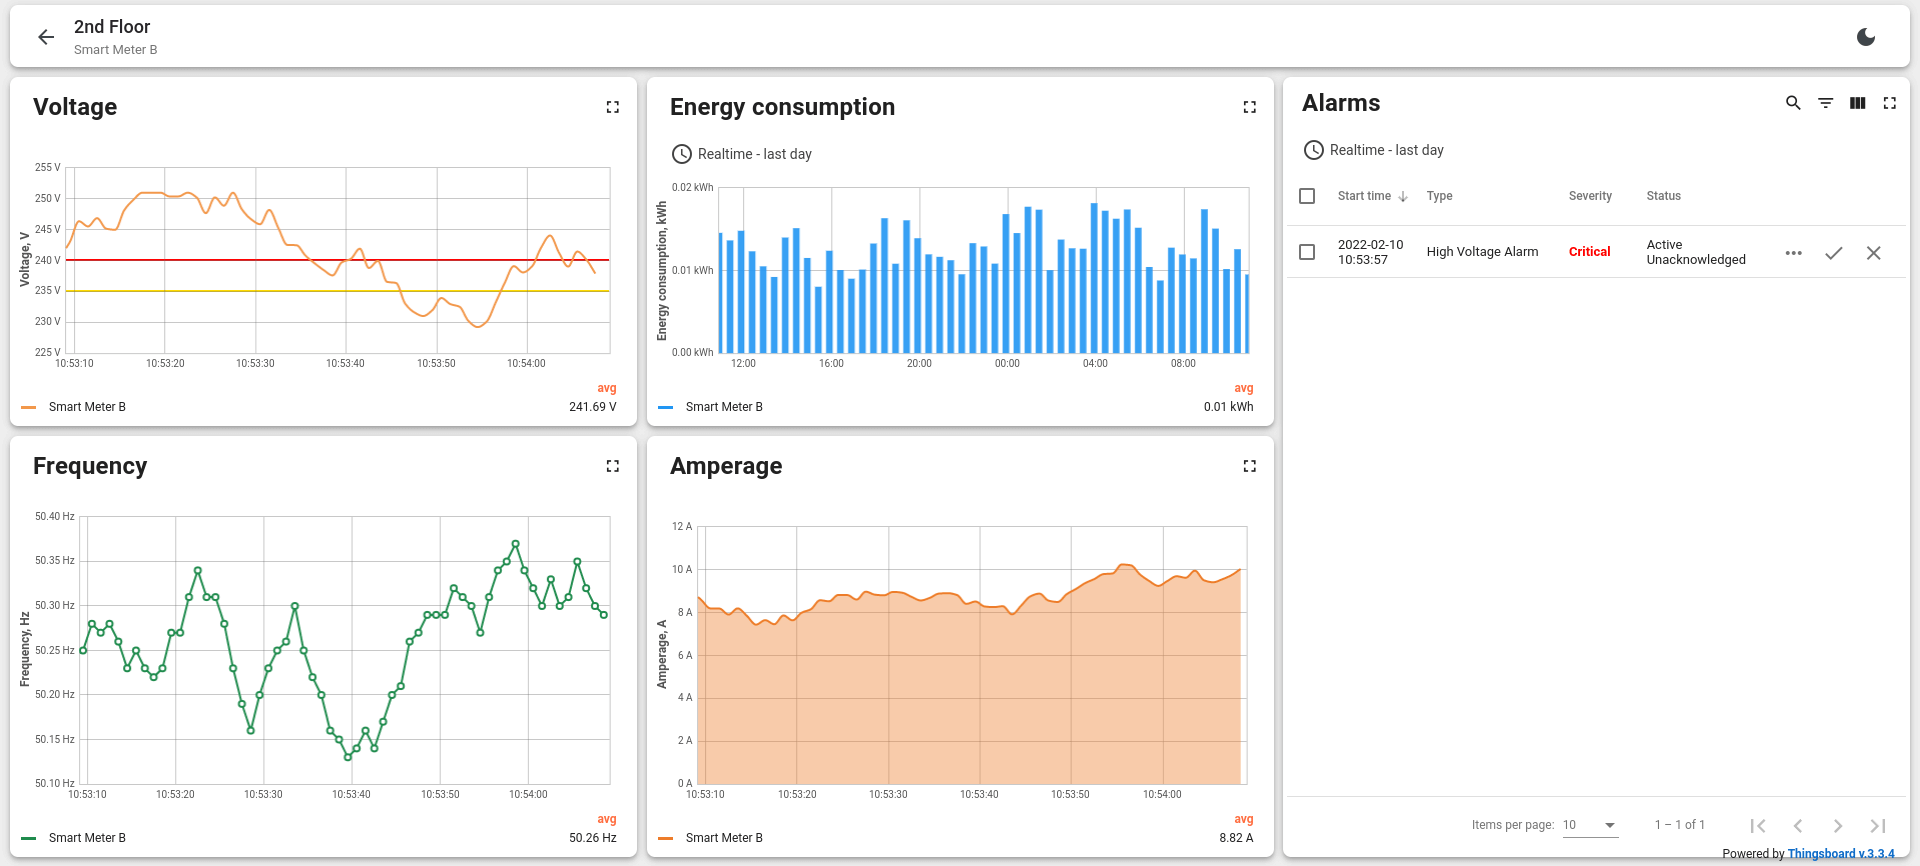
The result from an end-user perspective is a small and portable device that you can attach to all kinds of machinery or pipes. You can then open up a webpage and watch results in real-time.
Looking at a graph, you can figure out if and when something is happening. The exact analysis will naturally depend on the exact use-case. For example, in the graph below you can see two kinds of recurring activities in the system. The first one is one-hour-long intervals happening every 5-6 hours and the second kind is 10-hour-long intervals happening at night.
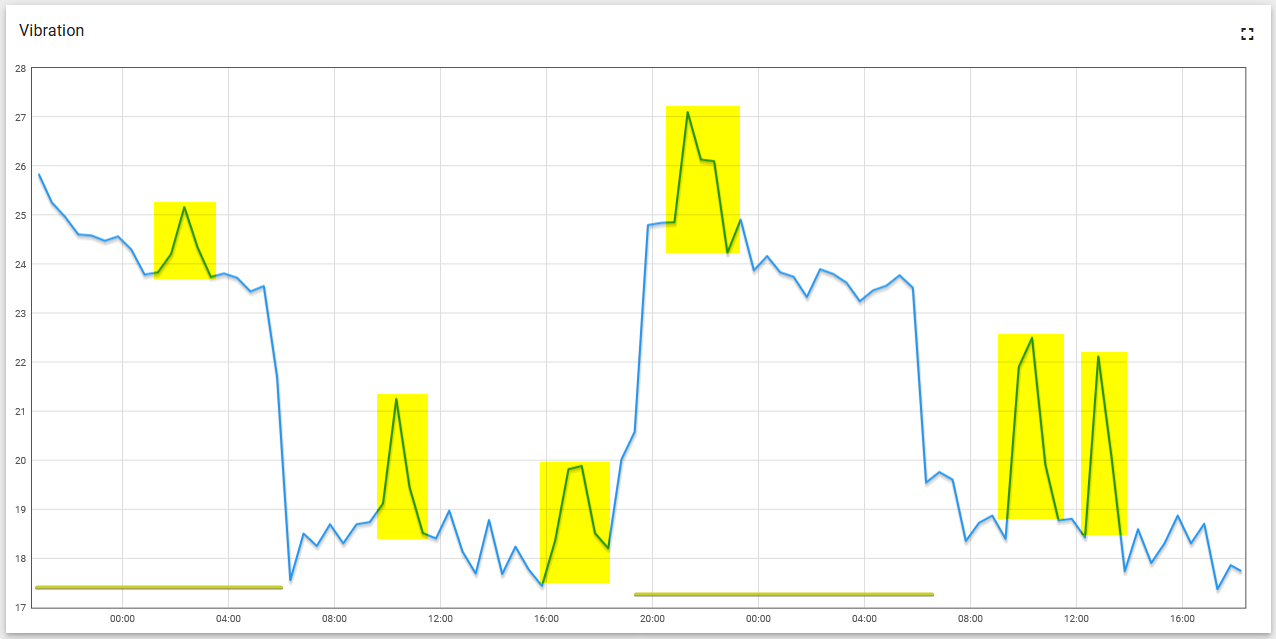
As a side effect of using the nRF Cloud sample we can also have optional location and temperature data.
The 1400 mAh battery lasts over two days while transmitting a vibration sample every 20 seconds. The battery can be fully charged in 3 hours from a USB power source. Every packet is about 60-70 bytes, UDP, no connection is needed.
Summary
I described the process of creating a cellular, DIY, IoT device. I started with a set of requirements and built a solution tailored to those requirements that is mostly made of off-the-shelf components. Some of the components are hardware, some firmware, some online services, but when combined allow a low-cost solution to be developed. The only cost in this project was time and I estimate I spent 10-20 hours researching and implementing the various options. Since I released the project as open-source, next time somebody is going to try something similar the barrier will be even lower.
From a technical perspective, some improvements can be made. Data communication can be made even more efficient or more secure. For example, every N measurements can be batched together and sent in one CoAP packet. This might require some kind of a splitter service in the back-end.
Some issues still exist, for example, accelerometer readings are different when the device is powered from USB vs from a battery. The cause of this should be investigated and could be related to differences in voltages, noise from other components or differences in clocks in a low power state. For now, however, the sensor does what I need it to do and since this is a DIY project, I’m good. “Mic drop”.
Let me know if you have any comments or feedback. Next I will discuss a different approach many would take in this situation, buying an existing sensor product, and will compare it with the process I covered here.