Introduction
VMware is a serious platform for enterprise-scale virtualization. VMware also offers a free ESXi hypervisor and plenty of individuals choose to use that for various small setups, such as home labs or home infrastructure.
VMware maintains a list of hardware devices, which are compatible with the hypervisor. VMware products also implement many features and support countless technologies. Naturally, none of that is geared toward home use but towards high paying customers utilizing big specialized storage devices, fast network, expensive server grade hardware, etc. So if you are finding yourself in a situation where you are trying to setup such an infrastructure on a relatively simple home grade machine, expect to be doing a lot of hacking and using unsupported features.
My goal in this experiment was to check various ways to connect local SATA disks of a host machine to a VM while measuring performance and supported features (specifically SMART). I also compared performance vs a bare metal configuration.
Configuration
The host in this setup has the following specs:
- Asus Z97-PRO
- Intel Core i7 4790 3.6Ghz
- 2x8GB DDR3 2400MHz
- WD Red 3TB, WD30EFRX-68EUZN0 x3
- Samsung 850 EVO 250GB, MZ-75E250 x2
- some additional USB and HDD boot drives
- ESXi 6.0 (evaluation)
The motherboard features six 6.0 Gb/s SATA ports via an on-board Intel IO Controller Hub and another two 6.0 Gb/s SATA ports via an additional (on-board) ASMedia PCIe SATA controller.
In this experiment I was primarily interested in having everything in one box, so networking didn’t have an effect on the results.
Both HDD and SSD drives were tested.
In the bare metal setup, the host was running a Windows 8.1 Pro 64 bit OS.
The VM was running the same Windows 8.1 Pro 64 bit. The specifications of the VM were:
- 1 vSocket with 4 vCores.
- 4GB of RAM
VMware (local) storage basics
Here is a review of the typical challenges and issues to help you understand the test results. Feel free to skip this section if you are familiar with the concepts.
Right from the start, ESXi will not support any of the above-mentioned controllers. This is not a big surprise if you consider that a production hypervisor in a serious company shouldn’t have any local storage anyway (except perhaps for ESXi boot USB stick). The expectation is that you would have a networked storage solution for the ESXi to use. In a home environment, that would mean an extra NAS machine and an expensive network setup (10Gbps if you want to reach the throughput we will be showing here) to connect everything. So we start the unsupported route and make ESXi recognize our controllers using this guide.
Now that ESXi recognizes our drives and controllers, we can create a Virtual Machine File System (VMFS) on the disk(s), which will make the space usable as ESXi storage space to allocate to one or more VMs, or we can perform Raw Device Mapping to map a whole disk to a single VM.
There is an additional way to pass storage devices to a VM, by passing through whole PCI controllers. There are many advantages to using this method. Unfortunately, I wasn’t able to make any of the on-board controllers mentioned to pass through.
Once a VMFS storage has been created, we can create thin or thick provisioned VMDK (Virtual Machine Disk) volumes on the VMFS and assign those to VMs. The disadvantages of using VMDK are some expected reduction in performance (due to another layer of storage virtualization) and lack of SMART data from the underlying device.
To do a properly supported RDM, you would (again) need some non-home grade hardware. Certain SAS HBA or RAID cards could present the disk in a way that ESXi would allow to do a proper RDM for them. Read this excellent guide about the various storage options and their pros and cons. Note that in that article they are using the LSI SAS 2008 controller. As we don’t have a supported controller, we go the hacking route once again. We implement RDM in an unsupported way using this guide. Do note that vmkfstools support creation of two types of “fake” RDM. One is for Physical RDM (direct access to hardware but no snapshots, etc) using the -z switch and one is for Virtual RDM (see more detail in flexraid’s article) using the -r switch.
Regardless of the type of disk space you have created, you will need to present the disk to the VM through a virtual controller. VMWare offers four types of SCSI controllers to choose from and one type of SATA controller (not available in the free ESXi version). Not all four types are compatible with each OS. For Windows 8 I successfully used the following virtual controllers:
- LSI Logic SAS (default)
- VMware Paravirtual (this controller is assisted by a driver in the VM)
- SATA
ESXi also has a concept of a “hardware version”, which is a property of a VM. Versions above 8 require a paid version of ESXi. SATA is an example of a feature that is not present in version 8.
Testing
For each drive type (HDD or SSD) I performed the following performance test: (ICH, ICH-ExpPort) x (AHCI, IDE), ASMedia, (VMFS, RDM Physical, RDM Virtual)x(SAS-V8, SAS, Paravirtual, SATA). This is about 17 tests per drive type. Five tests are on the bare metal OS and 12 tests are on the virtual environment.
Testing was done using CrystalDiskMark automated by DiskMarkStream.
The fixed parameters of the test were:
- 5 iterations
- 4GB test file
- Random data
Read my article about performance benchmarking if you need to review the basic metrics and terminology of benchmarking.
The drives shown in results were not used for anything else at the time of the test (not an OS drive, etc). The VMFS only contained one, thick provisioned (lazy zeroed), VMDK for the test.
Baseline
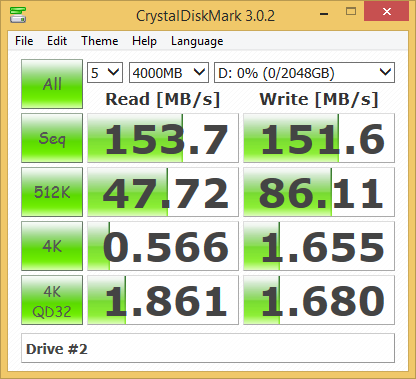
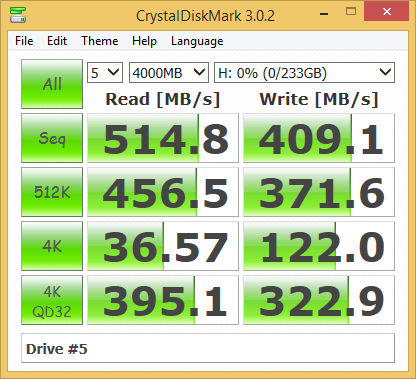
I decided to use the on-board ICH in AHCI mode on a bare metal machine as baseline. Here are the typical results:
It is outside of the scope of this article to discuss the meaning of the baseline results. It is enough to say that the results are within the expected ranges. Read IO Performance Benchmarking 101 for further explanations.
Benchmark
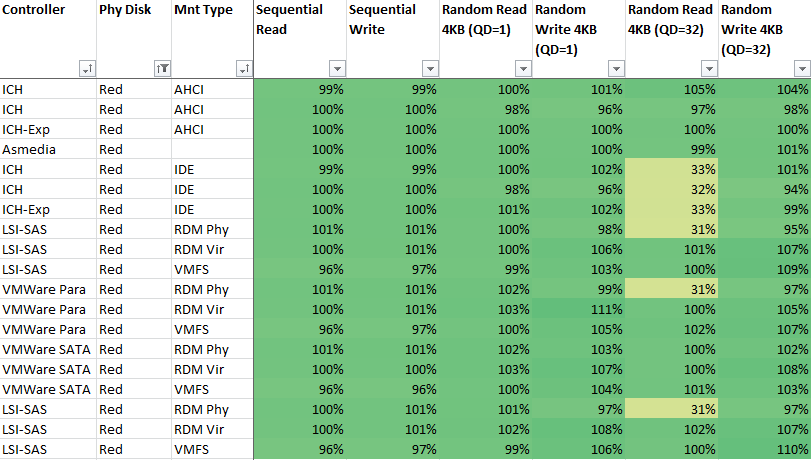
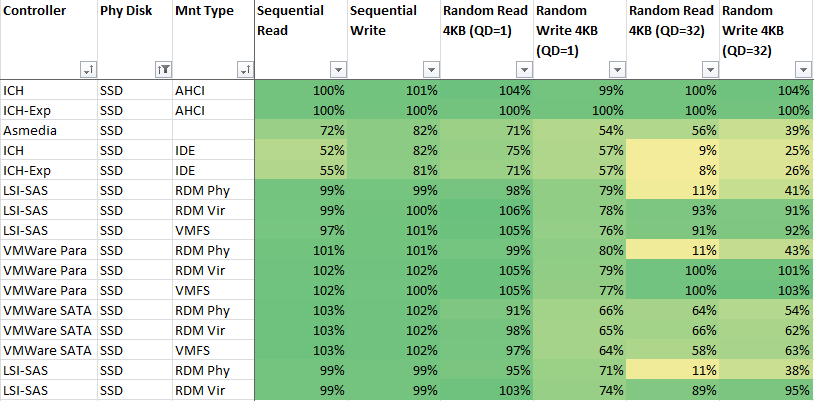
In the tables below, each measurement is shown relatively to the baseline, where 200% would mean twice the performance of the baseline for the same metric and 50% would mean half of the performance of the baseline for the same metric.
Please take into consideration that I used more than one drive of each type, and each test run gives slightly different results, so it makes sense to disregard any small changes (less than 5% IMO) from the baseline.
Benchmark summary and conclusions
VM hardware version 8 vs 11
The last 3 rows of the HDD table and the last 2 rows of the SSD table are of a VM running as “Hardware version 8”. The other metrics are of a V11 VM. Only the LSI-SAS controller was tested in both modes.
This hardware version configuration option made no apparent change in performance.
VMFS vs Virtual RDM
No noticeable difference in VMFS vs Virtual RDM performance for SSD drives. A small reduction of performance with VMFS for spinning drives. My assumption is that VMFS requires more disk-head seeking due to an additional file system layer and that reflects badly on spinning disk performance.
For spinning disks, there was no significant performance degradation compared to the baseline. For SSDs, the virtual controllers couldn’t keep up with the max IOPs, except for the Paravirtual option that aced all but the single thread writes.
Physical vs Virtual RDM
For a SATA controller, physical vs virtual made no difference in performance. For SCSI controllers, however, the physical option was generating very low parallel read rates. The performance was comparable to a physical SATA controller in IDE (legacy) mode. This can suggest that the SCSI “physical RDM” driver is lacking some kind of support to engage in parallel IO (lack of native command queuing perhaps).
Virtual SATA vs SCSI controllers
SATA made little difference vs SCSI for spinning disks, except where the “physical RDM” is “broken” for SCSI. The big difference was for SSDs, where the virtual SATA controller just couldn’t keep up with the IOPs.
S.M.A.R.T.
I also tried to read S.M.A.R.T. data from the disks. Clearly this is a non-issue for bare-metal (works) and for VMFS (not relevant). The ability to read SMART data is expected to be a feature of RDM and specifically of the physical version of RDM. To my surprise, it didn’t work particularly well. Virtual RDM doesn’t provide any data and the disks themselves are showing as generic “VMware disks” in device manager. Physical RDM disks do show with their proper physical names, but most SMART utilities are unable to read any data. SMART analysis software that excel on bare-metal systems, didn’t work for physical RDM disks. This includes CrystalDiskInfo and HDTune. I was able to identify two utilities that are able to read SMART data in such setup. The first is StableBit scanner, when put in UnsafeDirectIo mode. The second is smartctl when used with the -d sat parameter (for SCSI to SATA translation)
Conclusions
It seems that no optimal configuration exists for the build above using on-board devices. You have to choose between having SMART data in the VM or having optimal performance. This supports the popular best practice of using a discrete disk controller with ESXi-based storage setups. Something we will check next. ‘Till next time!


Pingback: Experiments with dead space reclamation and the wonders of storage over provisioning | Arik Yavilevich's blog
Pingback: Understanding And Improving VMware Snapshot Integration In FreeNAS | Arik Yavilevich's Blog