Introduction
I have a Home Assistant-based Smart Home in my apartment. Many of my electronic devices are connected to HA and I can monitor and manage them centrally. The main communication method for all the devices is Wi-Fi with Zigbee being a second option.
Some time ago I wanted to monitor several processes outside of my apartment, such as solar and electric water heating which takes place in common areas of the building. The relevant data is low bandwidth; several temperature readings and few statuses to be sent every few seconds and maybe some commands in the other direction as well.
Requirements and considerations
A wired network would ensure good connectivity, but it is painful to deploy, especially in common areas, so I decided to go wireless. My Wi-Fi network doesn’t reach the target location, so I had to come up with another way. Besides, I wouldn’t want to place devices that have the Wi-Fi credentials of my home network out there in the open, unprotected. The core of the building is made of thick reinforced concrete so it seemed I would need several “hops” to reach my location. This seemed like a natural use case for a wireless mesh.
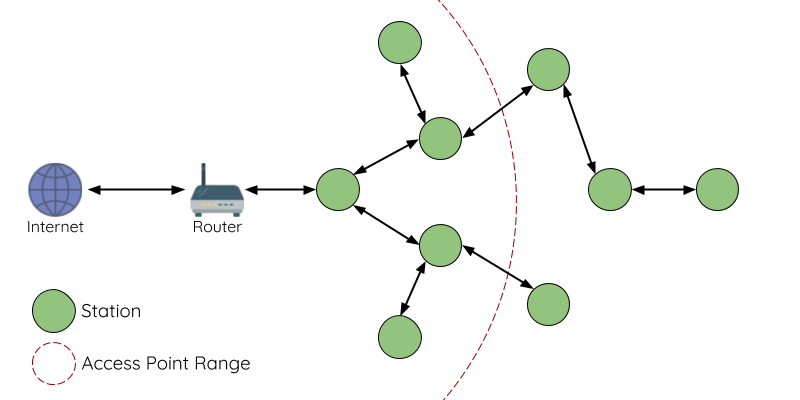
The idea of a mesh is that you have a set of devices that talk to each other in such a way that they can send and receive data even if the source and target of the communication is not in direct connection with each other. The data will go several “hops” until it reaches its destination with the devices on the way retransmitting the message. You would usually have one station, that is the gateway/bridge. The gateway connects to a server on your Wi-Fi network and on the other side it communicates with other nodes of the mesh via a different channel.
Evaluating options, round 1
A very popular option for ESP32 Arduino mesh is the painlessMesh library. There are several online tutorials which are quite good. It seemed popular, maintained and easy enough to use and so my v1 mesh was based on this library.
Espressif offers a Mesh Development Framework (AKA MDF or ESP-MESH), which is in turn based on top of ESP-WIFI-MESH (to differentiate from ESP-BLE-MESH). This setup has been archived since 2025, and they now instruct you to use ESP-MESH-LITE instead. All these solutions are relatively low-level and designed for ESP-IDF, not Arduino. I decided to go with another direction because I was looking for something that is simple and Arduino-based.
painlessMesh
painlessMesh uses Wi-Fi as the communication protocol so you can send large payloads. For ease of use and flexibility, it uses JSON as the payload format. painlessMesh is not a simple project but based on observations and looking at the code, I got a basic understanding of what is going on. As always, feel free to elaborate or correct me in the comments if needed. painlessMesh doesn’t use Wi-Fi in a traditional way as you would use it in a typical setup with routers, access points and devices. Instead, every device creates a separate AP and is also an end device. Due to its dependence on Wi-Fi, the device can connect to only one other device at a time using the STAtion role and several other devices can connect to it using the AP (access point) role. The library performs discovery of nearby nodes and forms connections to make sure every node has a path to the master node (gateway or bridge). This is called “a routing-based mesh network” and when it works it forms a tree graph.
On the gateway node you receive messages from other stations and forward them to the MQTT server on your main network. HA can be configured to subscribe to the MQTT data and convert it to sensors, entities and automations.
I implemented my mesh using painlessMesh and it was ok for some time. Data was flowing. I was able to receive messages from outside of my “normal” Wi-Fi range. But sometimes, parts of the mesh would just disconnect and not connect back. It felt as if it was sensitive to the order in which the nodes come up, and overall, it just wasn’t reliable. At one point I decided to add a node between two other nodes to shorten the distance and make RSSI better between each two nodes. Unexpectedly, this made things worse and caused more offline time for no apparent reason. Maybe my layout or the thickness of the walls is just too difficult for a mesh? In the end it was far from painless. A self-organizing mesh might sound great at first but once it regularly fails to organize, you just want to smash it and replace it with something dumb that just works.
Evaluating options, round 2
With the goal of adding reliability and redundancy to the mesh, I decided to look for implementations, where every node talks to every other node within reach. This is called a flooding-mesh, because the messages spread in all directions like spilled water does. This approach is more wasteful with network airtime, but it is simpler to implement and very practical for a small mesh with low data throughput. Overall, my mesh has less than 10 nodes where nodes send data, status and metadata every 5 seconds or so. Easy-peazy.
How do you broadcast something to other nodes without forming a Wi-Fi network? This is where ESP-NOW comes into play. ESP-NOW is a protocol that ESP devices can use to communicate with each other without a traditional Wi-Fi network. This is kind of like a point-to-point communication between two devices or a one-to-many broadcast and it doesn’t form a network. I have used ESP-NOW in a commercial project in the past to synchronize several independent parts of a robot and it was very successful.
There are several options of ESP-NOW based mesh libraries:
- espNowFloodingMeshLibrary – last updated in August 2020.
- espNowFloodingMeshLibrary2 – last updated in December 2020. Has some improvements to V1.
- ZHNetwork – deprecated
- zh_network – maintained recently but it is ESP-IDF based and a routing-mesh. Not something that I was looking for but might be good for other mesh setups.
- m2mMesh – looks like development has stopped.
I chose to use espNowFloodingMeshLibrary2 for my v2 mesh. I felt that it is simple enough so that if something goes wrong, I can troubleshoot or fix it easily myself.
espNowFloodingMeshLibrary2
Once I started building with espNowFloodingMeshLibrary2 (eNFML2), I got a few errors. Following Issues and PRs in github I ended up using a better maintained fork instead. Later I would fork the fork and make additional changes of my own but first step first.
eNFML2 is a bit lower-level than painlessMesh. First, it is ESP-NOW based, and ESP-NOW messages are limited to 250 bytes. Once you subtract eNFML2 headers you get a maximum payload size of 226 bytes. Second, it is pure broadcast. Every message you send goes to all other nodes in an eNFML2 network (assuming it is not stopped due to Time-To-Live) and if you are looking to know who sent the message or who is the target of a message then you need to implement that yourself. I chose to add 2 DWORDs to the headers to denote the source and target of the message. I chose to implement addressing based on MAC addresses and some special values to denote “gateway”, “everybody”, etc. This reduced the payload even more to 218 bytes, but it was still fine for my use case, even when using plain JSON. If I had larger payloads I would have switched to CBOR, MsgPack or ProtoBuf encoding for more compactness.
Few gotchas to mind when using eNFML2
- channels: Wi-Fi can operate on different channels. Normally the channel is set by the router/AP. An ESP32 can communicate on only one channel at a given time. Since our gateway connects to a Wi-Fi network, the channel of that Wi-Fi network determines the channel we can use for our mesh. All the stations need to be configured to use that channel for Wi-Fi and for ESP-NOW.
- bsid: an id of your choosing for your mesh network. This way there could be separate networks in the same area and using the same channel without them conflicting with each other.
- TTL: the maximum number of hops a message will go in a mesh. Used to prevent an edge case where a message is being sent endlessly (back and forth, in a cycle, etc.) in a mesh. Typically, this should not happen because eNFML2 implements detection of sent messages and will ignore duplicates, but bugs happen. Set the TTL value to the longest path you expect to form in your mesh plus some margin.
- STA vs AP Wi-Fi interfaces: I wanted my nodes to expose a regular Wi-Fi AP in addition to them communicating using ESP-NOW. Not all combinations of modes and interfaces worked well. What ended up working for me was using the AP interface for a SoftAP and for ESP-NOW. Then on the gateway, I also use the STA interface for connecting to the main Wi-Fi network. To have the option to select which interface to use for ESP-NOW I forked the library and added some additional parameters to the initialization functions.
RSSI
Having been traumatized by my previous mesh issues, I wanted to know what the signal strength between each two nodes at any time is. Unfortunately, ESP-NOW doesn’t provide RSSI information. Fortunately, somebody online suggested using Wi-Fi for RSSI. The idea is that you configure an AP so that others will be able to scan you and measure signal strength towards you, but you don’t use the Wi-Fi for any actual data transfer, for that you use the mesh. Every node exposes an AP whose name contains the node’s identifier as the suffix and some common prefix. Each station periodically scans for other access points that match the specific prefix and report all findings by sending data to the gateway over a mesh. Then your gateway can publish RSSI data to MQTT/HA and you can troubleshoot your nodes placement.
OTA
Having each node establish a Wi-Fi access point plays well with being able to update the nodes over the air. Some of the nodes are in the ceiling or other hard to reach places and it is pure delight to update them wirelessly using ArduinoOTA.
Before, with painlessMesh I used the WiFiManager for OTA. I would trigger WM mode by sending a command to the node over the mesh and then uploading a bin file. This is cumbersome and wouldn’t work if the mesh is broken, so a positive side effect to the new architecture.
Security
Overall, I am assuming that the mesh is not secure. Temperature and other environmental data are not confidential, and the hardware is installed outside anyway. Making this secure would take much more effort.
painlessMesh is based on Wi-Fi so its communication is protected by WPA2-PSK, however, unless you go through the difficult process of encrypting your flash, the password to the Wi-Fi is available in the memory of the node. Since the node is outside of the apartment, there is no physical protection, an attacker can take it and read the data. With the password the attacker can set up their own nodes, send messages and perform MitM activity.
eNFML2 surprised me by having AES encryption. Unfortunately, the implementation is janky. AES in CBC mode is used but you need to specify an IV yourself. Since there is no way to send the IV in the unencrypted part of the message, it is not clear how one would implement it correctly. You end up using a fixed IV that can make the encryption weaker. Then we have the issue of keys being stored in flash again. Unless you encrypt your flash or store the keys in some kind of protected storage, you end up being vulnerable to somebody reading the key from the device. Once the key is known the attacker can read anything that is sent over the mesh and even send their own messages to the mesh because it is just unencrypted ESP-NOW broadcasts. As in many other cases, good security is complex and can easily increase the resources a project takes by an order of magnitude. An architecture for a secure mesh like this will require flash encryption and AES CBC where a random IV is sent with each encrypted message.
Conclusion
Simple mesh networks are possible with ESP32 and Arduino. Mesh network can help wirelessly connect external nodes to an internal Wi-Fi network without impacting security of the main network, even when the mesh is not secure.
Quick question, I’m trying out you version of the library, but can’t get past the initial _begin. The IDE is saying:
c:\arduino\libraries\espNowFloodingMeshLibrary2/EspNowFloodingMesh.h:29:87: error: ‘wifi_interface_t’ has not been declared
29 | void espNowFloodingMesh_begin(int channel, int bsid, bool disconnect_wifi = true, wifi_interface_t iface = WIFI_IF_STA);
| ^~~~~~~~~~~~~~~~
c:\arduino\libraries\espNowFloodingMeshLibrary2/EspNowFloodingMesh.h:29:112: error: ‘WIFI_IF_STA’ was not declared in this scope
Is there something else I need to include other than EspNowFloodingMesh.h ? I don’t want to use wifi for anything other than ESPNOW.
ESPIDF is 5.5, (arduino 3.3.5), platform is a doit esp32 devkit.
Hi gmc,
Thanks for letting me know.
I believe there was a missing include for esp_wifi.h
I added it. Try latest.