
I am in the process of setting up a home storage server that will rely heavily on over-provisioning. You can read more about my previous VMware – FreeNAS – ZFS experiences in other articles. In this article I will conduct several experiments showing how available disk space fluctuates at various layers in the system. This is intended for people who are generally familiar with the concept, but would like to see a practical use case. Hopefully by following through you will be able to fully understand the wonders of dead space reclamation and storage over-provisioning.

Basics
In an over-provisioning configuration, a central storage server will provide several storage consumers with more storage (in aggregate) than the storage server actually has. The ability to sustain this operation relies on the assumption that consumers will not utilize all of the available space. As in the case of a typical PC with a 1TB disk but only 200GB or so of used disk space. To achieve this, the server is required to know which space is used and which space is free. This is easier to achieve when storage is provided as file storage, using protocols such as NFS or Samba, because the server is aware of the files and the file system. When you need to do the same for block storage, additional challenges arise. A block storage will usually contain a file system. Some blocks might be in use by the file system while others are not used. Unfortunately in most cases the integration between the parties to communicate this utilization information is not good.
A basic way for servers to track used and unused blocks is to start with all blocks as unused (and un-allocated) and once a consumer writes to a block (in consumer address space) the block is marked as used and space on the shared storage is allocated for it. The downside of this method is that if a block was used but then freed at the consumer file system level, it will still occupy space at the server level. One cause for this is that data is not really deleted byte by byte when a user performs a file delete operation. The entry for the file is just marked as deleted while all blocks remain and keep their previous data. So what can we do such that deleted space doesn’t consume space at the storage server? Enter dead space reclamation.
Dead space reclamation in this context can be defined by either communicating to the storage server that a block is not longer in use or causing the storage server to store the block in such a way that doesn’t take up much space. The first is done through special protocols that a storage consumer will use to talk to a storage provider. One of these protocols that I will be using in our setup is called vStorage APIs for Array Integration. The second uses properties of the storage system, such as the ability to detect zero blocks or the presence of compression. When compression is enabled on the storage system, a zeroed block will take very little space even if allocated.
Configuration
I will not be describing the hardware configuration used for this experiment as the experiment is not about performance but rather about function.
Storage server
- FreeNAS 9.3 STABLE
- ZFS pool with 5.1TB logical storage
- ZFS sparse volume in the above mentioned pool
- Lz4 compression enabled
- ZFS volume exposed via iSCSI
Hypervisor
- VMware ESXi 6.0
VM
- Windows 10
- VM hardware version 8
It is worth noting that the FreeNAS server fully supports VAAI profiles and integrates nicely with VMware. In case you are using another storage server, you should first test to see what level of support is provided so you can review your results in light of what is supported. To find out the status run the following command at the ESX(i) shell:
esxcli storage vmfs extent listGet the “Device Name” of the relevant device, then run:
esxcli storage core device vaai status get -d [Device Name]Storage layers
Storage is always implemented in layers. In a typical minimal case you have a physical disk, which contains partitions, which then contain file systems, which then contain files. In my setup there are more layers due to presence of both a storage server and a hypervisor server. Each such additional function adds abstractions, which in turn make it all more complex but on the other hand enable all this wonderful stuff in the first place.
The layers for my configuration are:
- Physical disks
- ZFS pool
- ZFS volume
- iSCSI device
- VMware VMFS5 datastore
- VMDK files
- Simulated physical disk in the VM
- Partition
- NTFS file system
- Files and folders
As you can see, quite a few places to take measurements. So how am I going to do this?
Test Methodology
I will be performing various operations, such as adding or removing virtual disks, adding or removing files, etc. As I do this, I will be taking measurements of free and used space at the various layers and at the end I will present and analyze the results and reach conclusions.
Storage
I will use the following command to gather size data about the physical disks, pool (called ‘tank’) and volume (called ‘zvol’):
zpool list -p tank
zfs list -p tank
zfs list -p tank/zvol
zfs get -p all tank/zvol
I am using the ‘-p’ parameter to get all values in byte accuracy instead of being rounded to MB/GB/TB units. This will enable us to see scale better and to reduce confusion due to erroneous use of GB as GiB.
Hypervisor
I will use the following commands to gather size data about the VMFS (called ‘iscsi’) and VMDK (VM called ‘Test’):
esxcli storage filesystem list
du -a /vmfs/volumes/iscsi/
ls -l /vmfs/volumes/iscsi/Test
Note that ‘du’ returns metrics in KiB and there is no switch in ESXi’s du command to change the units. I will convert the units to bytes when we analyze the data in Excel.
I will be using an ‘unmap’ command to cleanup space using the VAAI protocol. The syntax is:
esxcli storage vmfs unmap -l iscsi
VM
I will use the following commands to gather size data about the “simulated physical disk”, partition and NTFS file system (labeled ‘t:’):
wmic diskdrive list brief
wmic partition list brief
fsutil volume diskfree t:
I will use a dd build for Windows to generate test files on the files system. Files with varying content can be created like so:
dd if=/dev/random of=t:\test\random100gb bs=1M count=100000 --progress
dd if=/dev/zero of=t:\test\zero100gb bs=1M count=100000 --progress
Please note that the above command will generate a 100,000 * 1MiB = 100,000 * 1,048,576B = 104,857,600,000B file, which is neither a 100GB nor a 100GiB file. In retrospect this was not the best choice, but since it is close enough I will refer to this as “100GB”.
I will also use two Windows Sysinternals utilities SDelete for cleanups and DiskView for examining the location of files on the disk. More details below.
Test Scenarios
I will be testing
- Creation and destruction of virtual disks
- Creation and deletion of files
- Zeroing disk space
- Thin virtual disks vs eager zeroed thick virtual disks
The expectations are
- That space is not really used on the storage server until data is written to a block.
- That available space on storage doesn’t increase once a file has been deleted.
- That available space on storage increases when highly compressible data is written over non compressible data or when unused blocks are un-mapped.
- Using thin virtual disks is the same as using thick virtual disks on a storage system that is thin on its own.
Confused about thin vs thick? As mentioned above, our storage setup is comprised of layers. Two of the layers we have, storage and virtualization, have the capability to set up volumes that are “thin”. A thin volume is not allocated on the disk until needed, which is a key part in having an over-provisioned system. Thin volumes have some performance impact due to having an additional mapping layer where thick volumes are just mapped in sequence (relative the address space of that specific layer) which is faster to process.
There are many possible combinations of options. I will be testing “thin on thin” (thin in the hypervisor and thin on storage) and “thick on thin” (thick in the hypervisor and thin on storage). I will not be testing “thin on thick” since I have made an early decision to make full use of zfs’ ability to maximize space through compression and sparseness. I will not be testing “thick on thick” as it is quite a trivial case of allocating what is created with an obvious loss of the ability to over-provision. See this wonderful article about the different modes of provisioning for more details.
Results
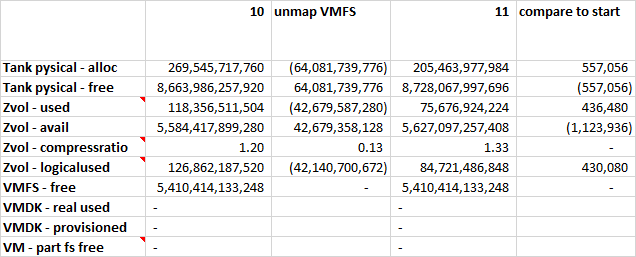
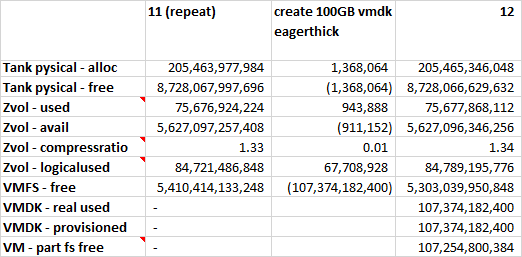
17 measurements were taken during this experiment. The metrics collected are placed in a spreadsheet, such that each column of measurements is separated from the previous measurement by a column of deltas. This way it is easy to see how each operation affected the metrics at each layer. You can find snippets of the data below, however you should download the full Excel spreadsheet if you want to take a deeper look at the data.
![]()
Interesting Observations
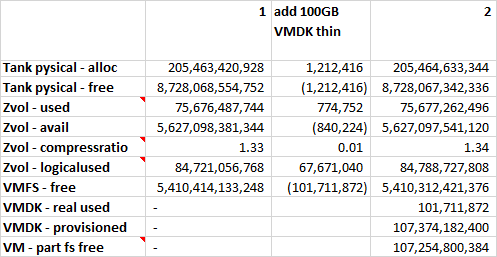
Allocation of a 100GB “Thin” VMDK and an NTFS file system
100Gb become available for the VM. Only 100MB are used at the hypervisor level. A mere 1MB of actual storage space is used. I speculate that VMware creates a 1:1000 index for the new VMDK, however this index is mostly empty, so it compresses well and doesn’t take much storage.
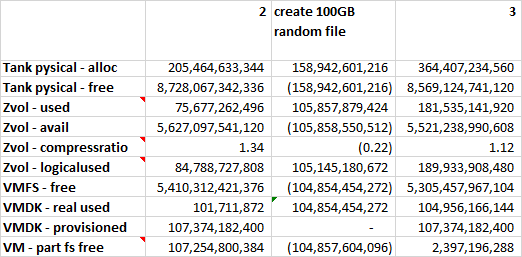
Filling the file system with a 100GB file containing random data
We loose 100GB on all layers and the compression ratio gets closer to 1.
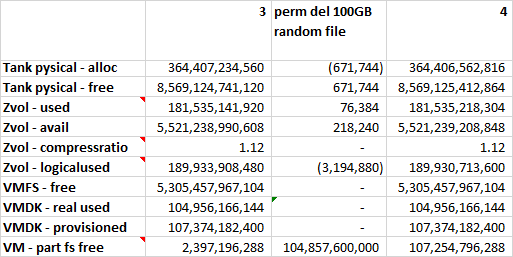
Deleting the 100GB file with random data
We gain 100GB of disk space in the VM, but other layers only experience minor changes in metrics.
In effect we reserved these 100GB to this specific VM. If another VM would like to write new data it will not be able to use this space on storage. In a scenario with zero available space in the zvol, another VM could get an “out of space” error even though the test VM has 100GB free. This is counter-productive to our over-provisioning goals.
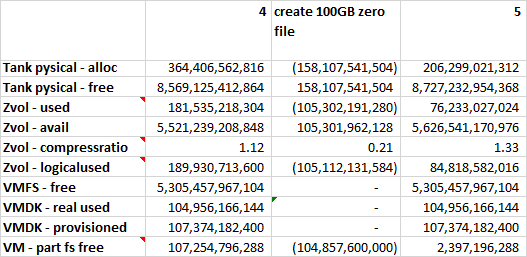
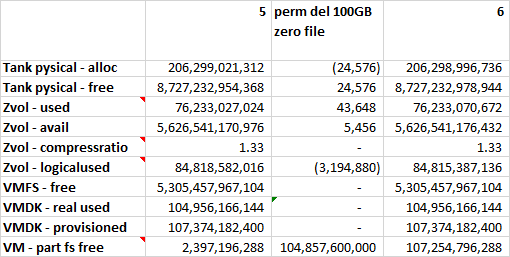
Filling the file system with a 100GB file containing zeros
We loose 100GB in the file system layer, we have no change in the hypervisor layer and we GAIN 100GB at the storage server layer. The compression ratio goes farther away from 1.
In effect we wiped the disk space previously storing random data. As zeros are highly compressible, we don’t need an actual 100Gb of storage to represent it, instead a mere 500MB will do. This is great for over-provisioning as another system can now make use of this space.
Deleting the 100GB file with zeros
The deltas are just like with the 100GB random file. Mind that the absolute available space was higher in the first place. What happens here is that there is a tiny change of a few bytes at the file system level to mark the space as unused. The file system can now report new total unused space as it sees it, but the higher layers are not aware of the fact that there is a certain file system on the device.
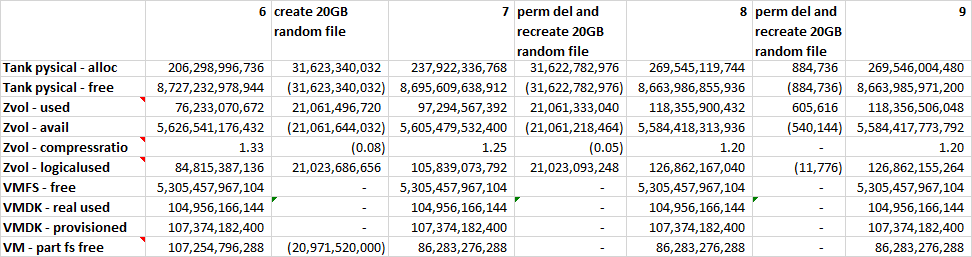
Creating a 20GB file with random data, deleting it and recreating it
This is an interesting case that went against expectations. I was expecting the file system to recreate the file at the same position resulting in no additional storage being allocated at the storage server. However at the first attempt the re-created file was allocated at offset 20GB (after the end of the deleted file) causing a 40GB allocation at the storage server. A second attempt had the third copy allocated once again at offset 0, causing no additional allocation from the storage server. To clear any doubt, creating a next file was done only after permanently deleting the previous file.
Further experiments with this were not conclusive. It seems that a decision of what free space to use for a new file is somewhat unpredictable and appears to behave in a round-robin like fashion. It is worth noting that this can cause waste of storage space, as adding and deleting files can waste more space than the max size of the files at any given point in time. In the end, this is worth taking into account but this is not a game changer. If you have information as to how NTFS implements this decision, please write in the comments section.
Deleting the 100GB VMDK
Originally this VMDK was allocated as “thin”, but at this point in time the VMDK grew and was occupying 100GB of space. By deleting it we gained 100GB at the hypervisor layer but had minor changes at the storage layer. We are now experiencing the same issue we had at a file system layer only now it is on a higher layer (the file system of the hypervisor).
How could we re-gain this 100GB space? We could use equivalent methods to what we tried before. We could create a new VMDK for another VM and hope it occupies the same location. We could fill the VMFS with zeros or we could communicate to our storage that this space can be un-allocated.
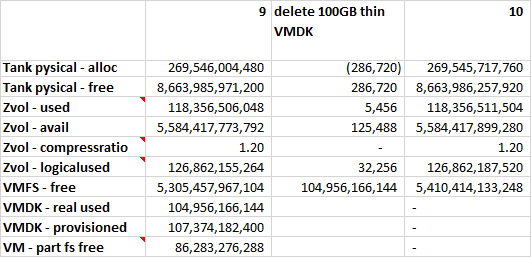
Unmap unused blocks at the VMFS
The area of the VMFS that contained the VMDK is still full of (random) data. Somebody needs to tell our storage that we don’t need it anymore. Fortunately, VMware can use the VAAI protocol to communicate that to our FreeNAS storage.
esxcli storage vmfs unmap -l iscsi
and 10 minutes later we are back to the available bytes value we had at the beginning of these experiments.
“Eager Zeroed Thick” provisioned VMDK
Very similar to the “thin” case, except we “lose” 100GB at the hypervisor layer right away. This is not an actual loss because the actual used space at storage only grew by 1MB as before. The difference here is that now VMware doesn’t need to manage the abstraction, which could deliver some performance gain.
You might think this might be an issue because we can run out of VMFS space quicker, but it isn’t really an issue since we can always increase the size of the iSCSI volume and the VMFS system, even higher than the available physical space. Remember we are dealing with over-provisioning.
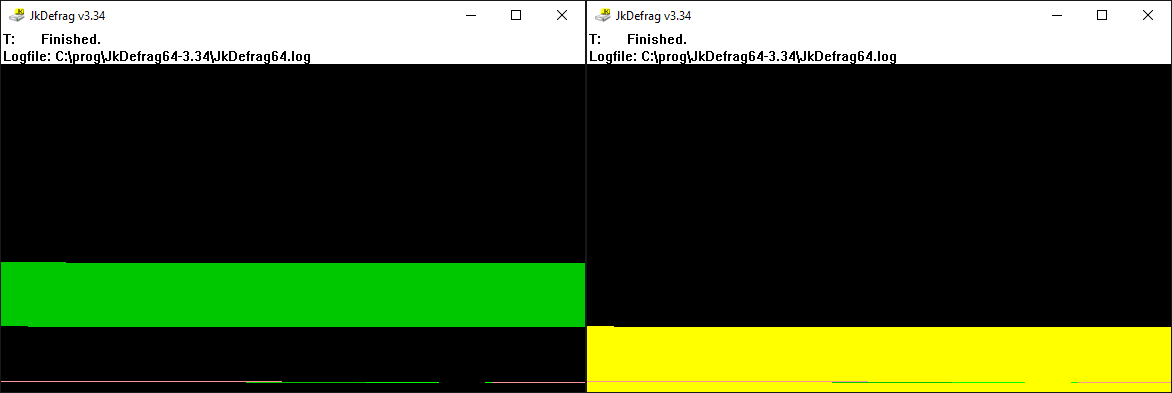
Zeroing the NTFS file system with SDelete
I have shown before that zeroing disk space at the VM can increase available disk space at the storage server. SDelete can zero the free disk space, which is equivalent to creating a large file containing zeros and then deleting it. Using SDelete has effectively the same deltas as creating and deleting a file full of zeros in previous experiments.
ZFS metadata overhead
Looking at deltas of data creation and unmapping operations we can learn about the size of metadata.
For example, adding “100GB” of random data consumes 104.8GB at the VM and hypervisor layers but consumes 105.6GB at the storage layer. This indicates a 1% overhead for random data.
Another example would be performing unmapping of “100GB” of zeroed space, which freed 300MB, in part compressed data and in part metadata.
Conclusions
Running a storage system that over-provisions requires some additional attention as compared to running a simpler storage system. FreeNAS with inline compression really creates an easy to use and almost effort-free way to allocate over-provisioned disk space. For a FreeNAS storage server, it is needed to zero discarded disk space in VM file systems and unmap discarded disk space in the hypervisor file system to achieve optimal available disk space.
Keeping track of “zero blocks” consumes space and is not as efficient as unmapping blocks. So if not a hassle, try to avoid “blanket” zeroing of disk space. Some better alternatives to zeroing are available to users of paid VMware versions. This utility can unmap blocks from a guest VM so they are unallocated directly instead of zeroed.
Additional reading with more techniques for addressing storage reclamation: Intro, Windows, Linux and zero fill.
As always, comments with your own conclusions are most welcome.
Great write up. Thank you.
Are there any negative ‘side-effects’ if an unmap/trim/dd/SDelete etc. command is not run…other than not knowing the actual used space from the storage system side (which is capable of almost unlimited over-provisioning)? Like if SDelete isn’t run against a Win 2k12 R2 – thick eager zeroed NTFS drive for the SAN to reclaim dead space, would an MS SQL 2k12 application that stores it’s DB in the same drive experience a performance hit?
Hi TechAz,
The short answer is: not that I am aware of.
The detailed answer is that if the volume is not using compression then a “thick eager zeroed” is the same to the storage whether it is full with data or full with zeros, right?
If you are using compression then it is a bit different. Zero blocks might be represented directly in the ZFS index (small blocks do) so that might have some effect. Might be worth measuring.
If you space is limited, then not wiping freed space can fill your storage and that might have negative effects on performance. It is suggested to keep a ZFS pool below 80% utilization: https://serverfault.com/questions/511154/zfs-performance-do-i-need-to-keep-free-space-in-a-pool-or-a-file-system